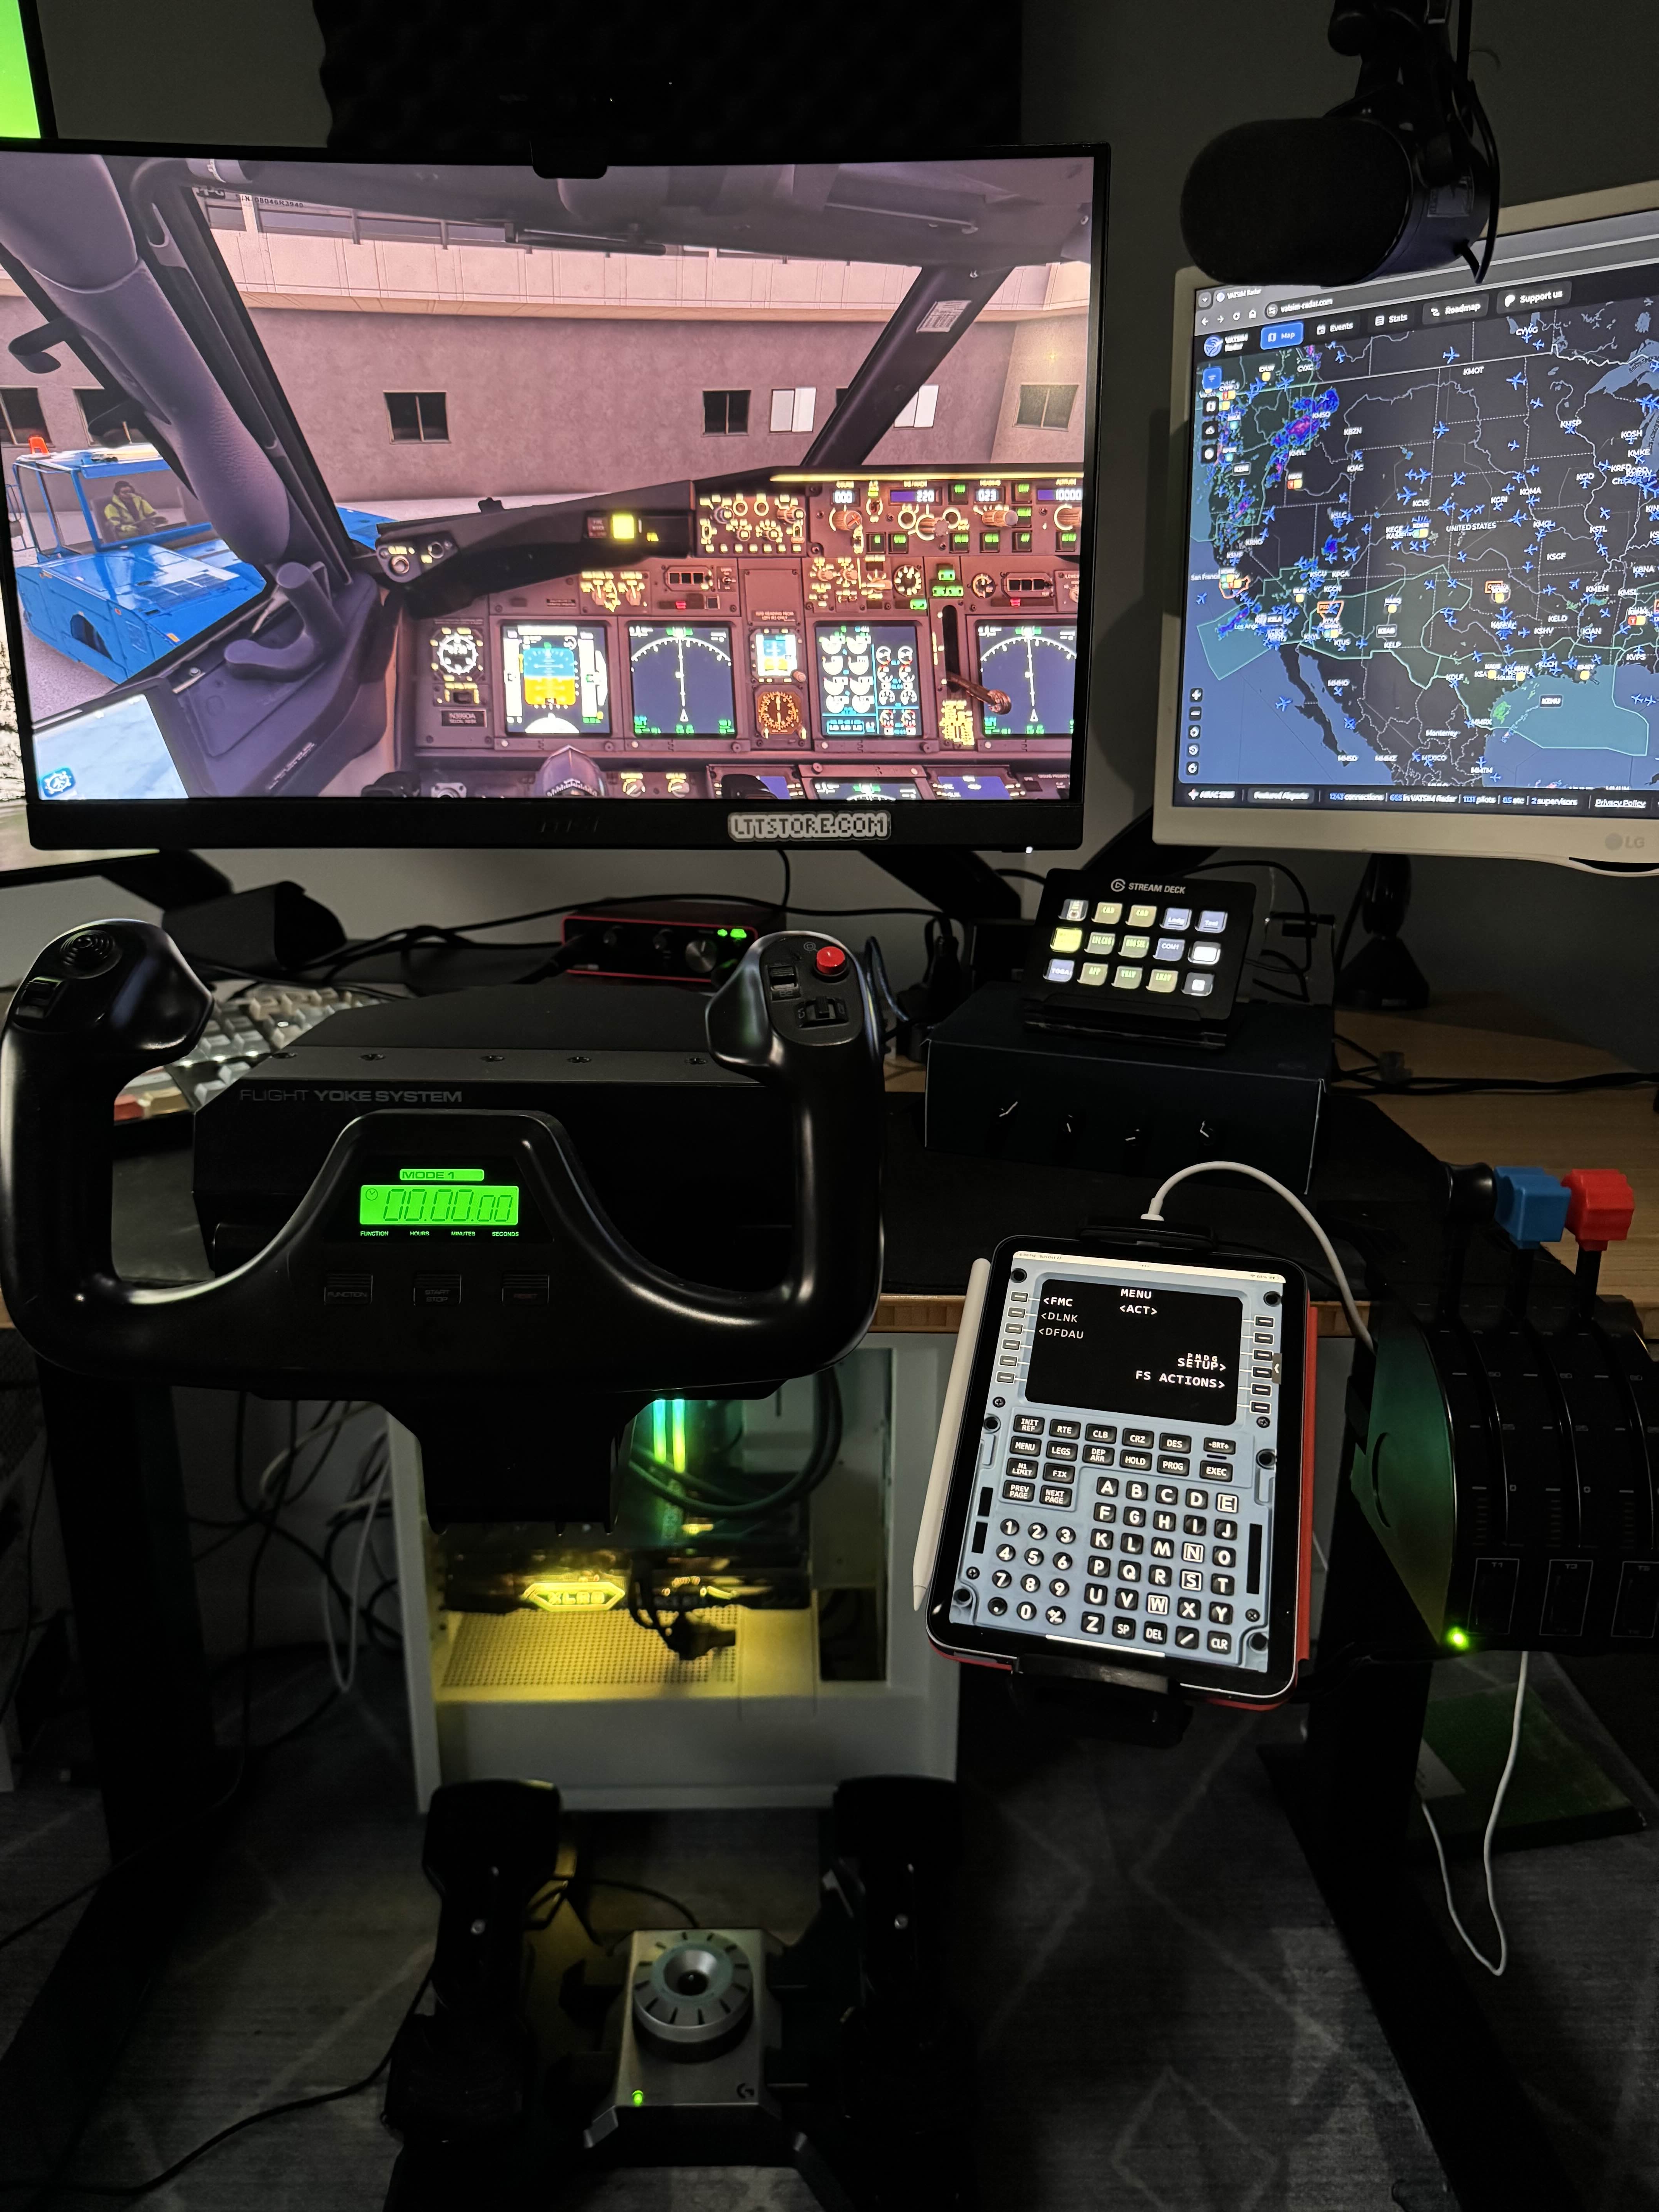
 Here it is, my mostly finished flight sim setup. My goal here was to be as affordable as possible, but still make it to my goal of being completely hands-off mouse.
If you're unfamiliar with the concept, it's truly an amazing feeling to have tactical, and real life switches, knobs and buttons for most if not everything you do on your typical flight. From of course the standard flight controls, to your NAV modes and MCP knobs.
Note: MCP stands for Mode Control Panel and is the top panel which controls your Autopilot settings. The NAV buttons and knobs like altitude and heading bug.
As you'll see during your reading, my goal here was not to look super realistic. But rather to have well functioning, minimalistic and affordable components that make my flights more enjoyable.
In this article I'll go into way too much detail about the individual components to my setup for anyone who cares to read. Most likely you'll be from TikTok, if you're interested I stream my flights when I can on @jpbberry.
Read the The simulator section.The simulator#
The first and most obvious piece of my setup is the simulator. I've been playing Microsoft's flagship flight simulator software since FSX: Steam Edition, so you can imagine my hype when Microsoft Flight Simulator 2020 was announced. I've been playing ever since.
As of the writing of this article, 2024 has not been released. I plan on playing as soon as my setup works with it :)
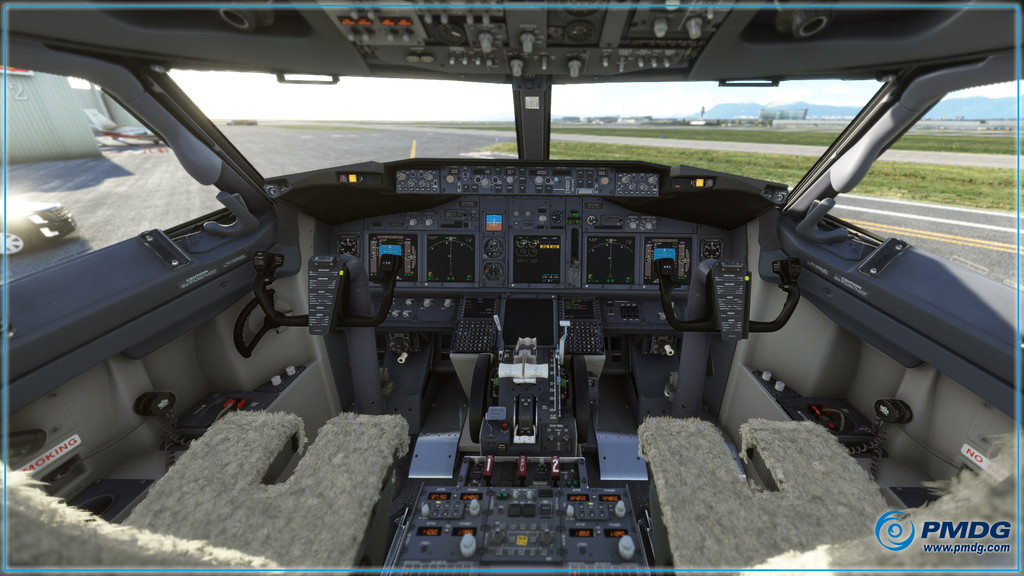
My goto line of planes is the PMDG 737 suite. Most typically the PMDG 737-800. But sometimes the 600. I love yoke flying, so no AirBus yet, but possibly in the future.
Read the Software section.Software#
Here's a couple of awesome software products I use and will most certainly be seen during my gameplay.
- Lorby's Axis and Ohs, is a piece of software which essentially acts as a translation layer for all kinds of devices to interact with the simulator and plane. This is an extraordinary important piece of software in my setup, half of what I do would not work without it.
- Little Navmap, while not being the best looking software, it is a really nice way to look around during your flight, and important for me, seeing the name of taxiways with live positions. One important feature is that it has a Web Server that lets you view map features on other devices like my iPad.
- Chartfox, is a really awesome website for FREE aviation charts, and a great alternative to a Navigraph subscription.
- Simbrief dispatch system. While I don't like the centralization of this product, it does work pretty well.
- Toolbar Pushback is an amazing free in-game tool for pushing back from airport gates. The pushback pre-planning feature is AWESOME and solves my biggest issue of being unable to aim for the taxi-line/parking spots with the built in PMDG pushback.
- Gees Flight Analysis, is a cool little software that shows you statistics about your landings. It's upsetting to see the in-game version is a paid version and I'll probably move away from this eventually but it's what I use now.
As this article goes on you'll see a lot more details about some of these pieces of software, especially Axis and Ohs, and some aren't on this list and will come up later especially around the Arduino setup.
Something which I don't really consider software is the VATSIM network but is an amazing service for anyone who's into realistic flying. It offers a real person on the other side of ATC, and is easily my favorite way to fly. I often also use vatsim-radar which is a great way to view controller availability and air traffic and is really well made.
Read the Primary flight controls section.Primary flight controls#
The most basic part of a real life setup is of course the primary flight controls. This includes my yoke, throttles and rudder/brake pedals.
If you're just starting out, one piece of advice I will always give especially if you're in a decently populated area is always look at places like Facebook marketplace and craigslist for cheap used flight simulator gear. Buying these things brand new is very expensive if you're looking to stay within a budget.
My yoke, throttle and rudder/brake pedals are all Logitech G Flight controls.
Yoke/Throttle: https://a.co/d/9r72kfN
Rudder pedals: https://a.co/d/7Lrehu1
I do quite enjoy these controls, they work very well, though they are certainly on the cheaper side of things when it comes to primary control surfaces. There's definitely room for expansion some day.
Read the Control layout section.Control layout#
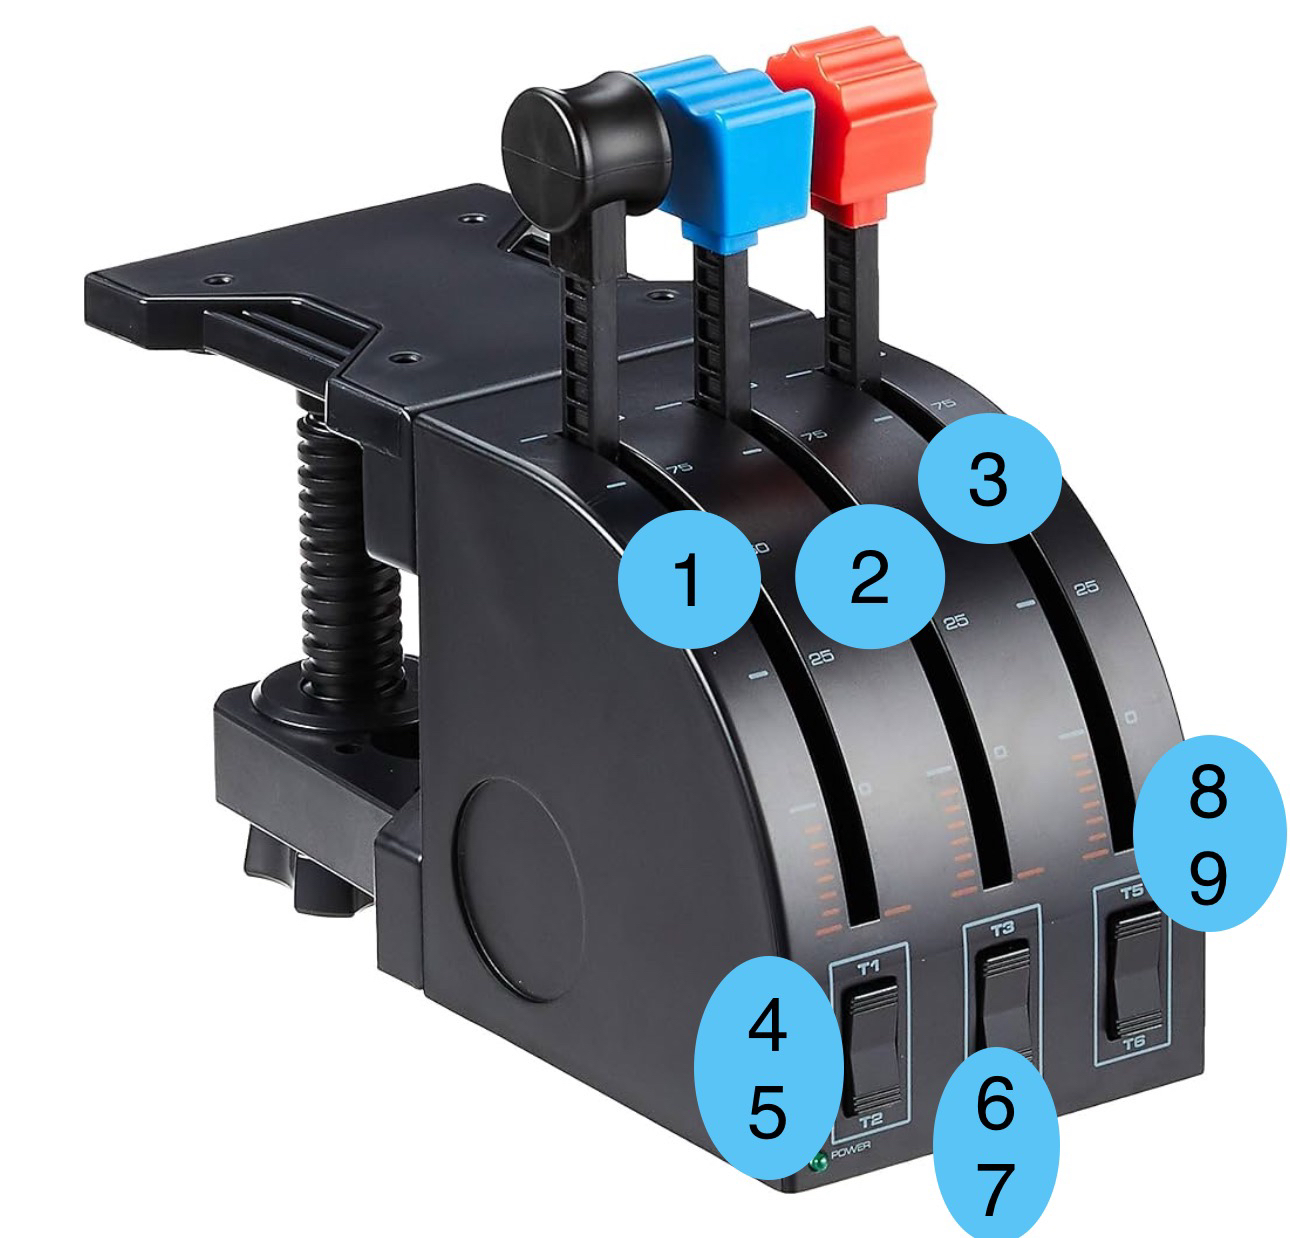
- 1 - Throttle
- 2 - Spoilers, rather than switching between two states with button
- 3 - Reversers 1 & 2 with Axis and Ohs
- 4 - Flaps up
- 5 - Flaps down
- 7 - Gear toggle
- 9 - Parking break
There are a couple of buttons I just don't have a use for yet/has been replaced by Stream Deck buttons with feedback.
The yoke is pretty much standard except for rudder trim being a look left/right.
Read the iPad EFB/FMC section.iPad EFB/FMC#
Note: EFB stands for Electronic Flight Bag, and while my iPad does a lot more than a normal EFB it seems right to call it that. An EFB is a real life tablet used for performance and flight planning by flight crews
Note: FMC stands for Flight Management Computer and is Boeing's name for the small system by the crews knees for managing routes, autopilot and navigation systems.
This is truly one of the crowning jewels of this setup and is one of the most significant reducers in mouse usage.
I use a 6th generation iPad mini, I've had it for a couple of years now, and it's the perfect size for an FMC. Though I would not go buy it just for this project. Pretty much any device with a decently sized screen and a web browser will do the same job, except 2 things which I'll get into.
The stand that wraps around underneath the desk bringing the iPad into a fixed, and convenient knee position is also not to be understated. I use this mount from Amazon: https://a.co/d/benx5Be
I've had this mount for a while to hold my devices over the bed and other convenient applications. I will say it is pretty expensive if you only want it for this, I'm sure there's cheaper alternatives.
Let's get into what the iPad can do
Read the FMC section.FMC#
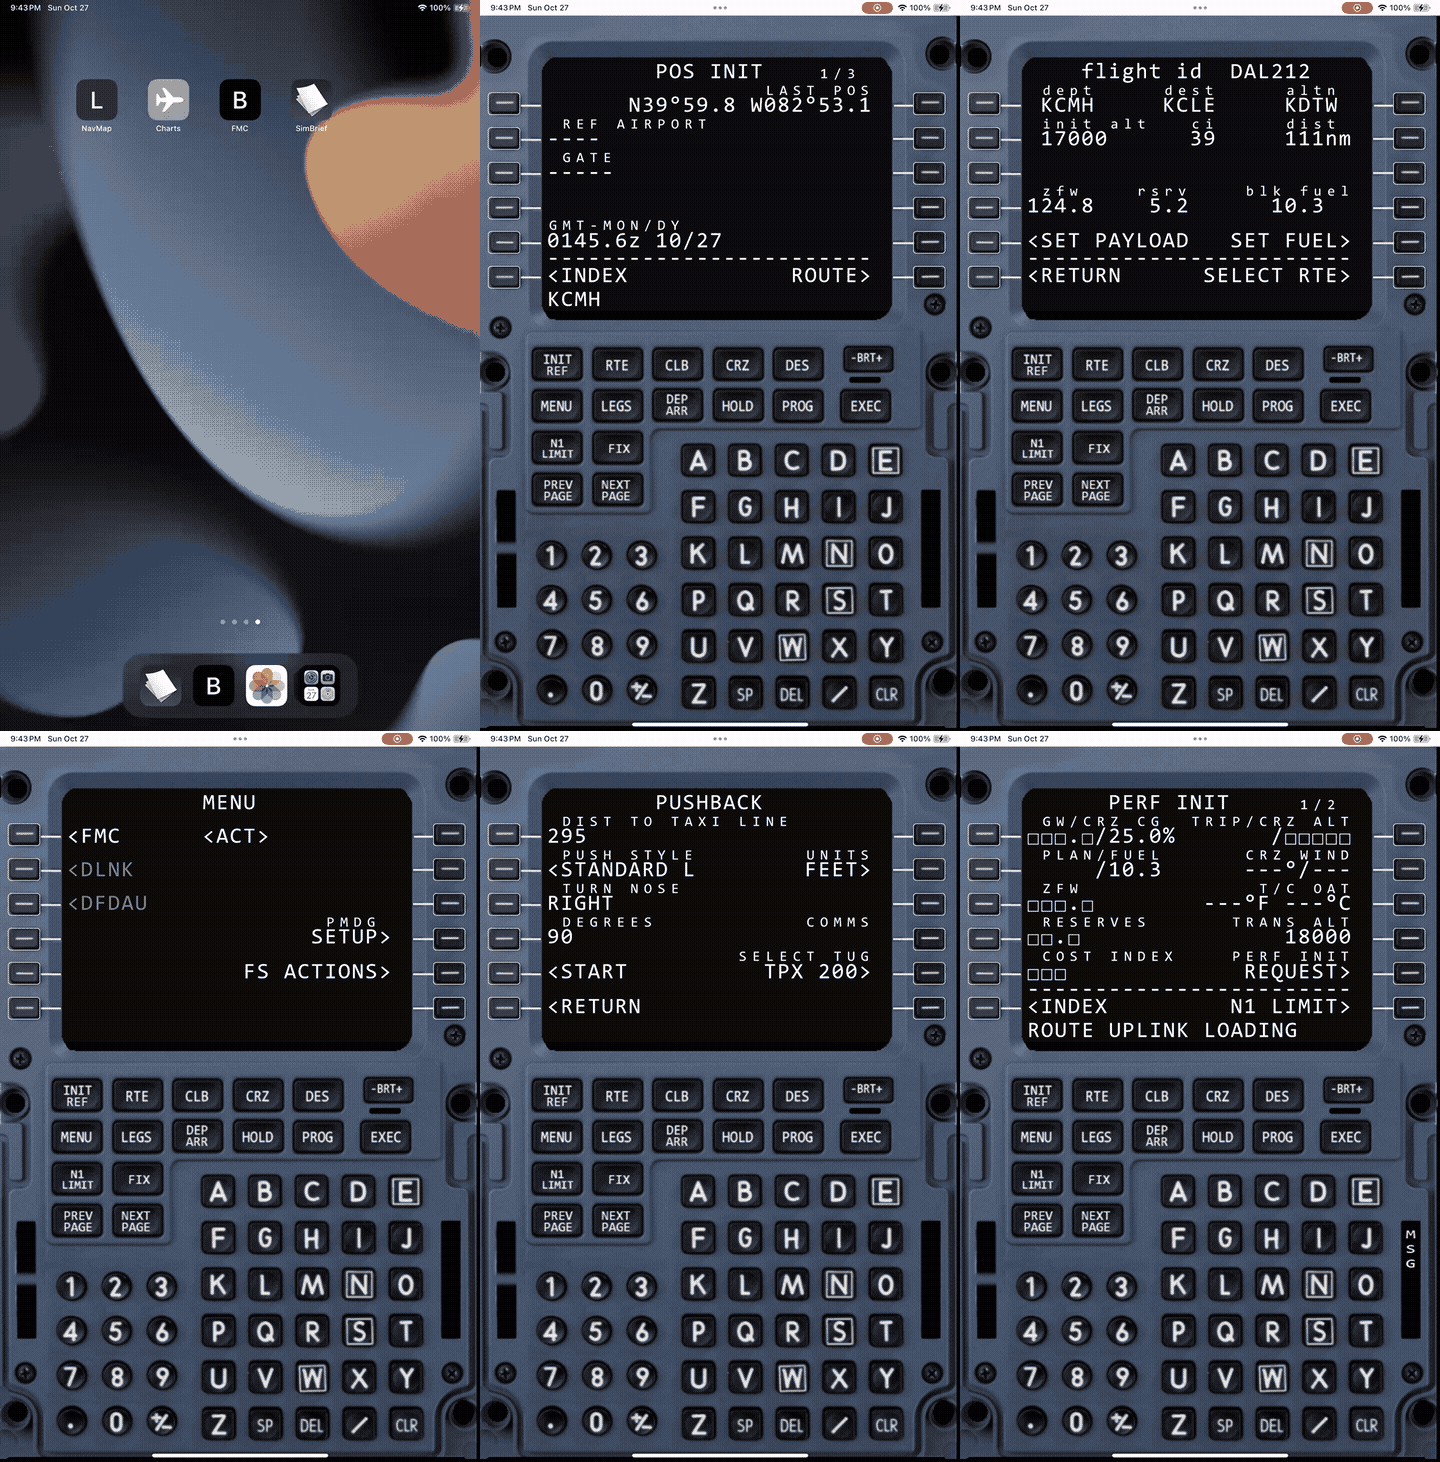
EASILY one of the coolest things that can be done on an external device is a Web CDU as AAO likes to call it. You're able to interact with the actual in-game FMC from a touchscreen, and the experience is just absolutely amazing.
And the best part? It's pretty much built into Axis and Ohs! There's no crazy setup needed (unless you're me), just head over to the Axis and Ohs downloads page and go to the "WebAPI web server examples" section and find your aircraft, then follow the instructions.
When I say "unless you're me," that's because I had all kinds of issues with getting the WebAPI to work with my iPad. I had to do all kinds of crazy stuff, reverse proxying and editing an EXE (😟). Nobody should run into these issues but if you have you can message me.
You'll be able to reach the website from any device on your local network, enabling it to replace the mouse fumbling required to enter and edit flight plans, performance and more.
Read the Making it an iPad app section.Making it an iPad app#
You'll see this section in Little Navmap as well, but in order for the home screen bookmark to show up as a standalone app rather than just opening Safari to the URL, you'll need to go into the .../WebPages/…fmc/index.html and add the following line in the <head> section
1<meta name="apple-mobile-web-app-capable" content="yes">
This should definitely become a built in thing on AAO :)
Read the Little Navmap section.Little Navmap#
Little Navmap is pretty good, but it is certainly not the best map tool in the world. So why'd I pick it? Because of the ability to essentially make it an iPad app that connects to your computer, and hence your simulator.
The feature is called Web Server, go into Little Navmap, and then enable Tools -> Run Web Server.
This will run a lightweight website that any device on your local network can connect to. You can see your route, zoom and pan around the map, and of course see where your plane is.
If you're using the app on a mobile device, I highly recommend enabling the Dynamic Touch and Drag map plugin, under the Plugins section.
The default will have you press where you want your camera to move and is not easy to use on mobile.
However, I have made the observation that enabling the plugin seems to make other live traffic not appear on the web app.

Read the Making it an iPad app section.Making it an iPad app#
In order for the home screen bookmark to show up as a standalone app rather than just opening Safari to the URL, you'll need to go into the C:/Program Files/Little Navmap/web/index.html and add the following line in the <head> section
1<meta name="apple-mobile-web-app-capable" content="yes">
Read the Simbrief section.Simbrief#
Blah blah everyone knows Simbrief. You can add it to your homescreen as a standalone app and I also use it to prefile flight plans on VATSIM.
After creating the flight plan I will import it into the PMDG Flight Tablet for FMC loading, and import it into Little Navmap
Read the Charts shortcut section.Charts shortcut#
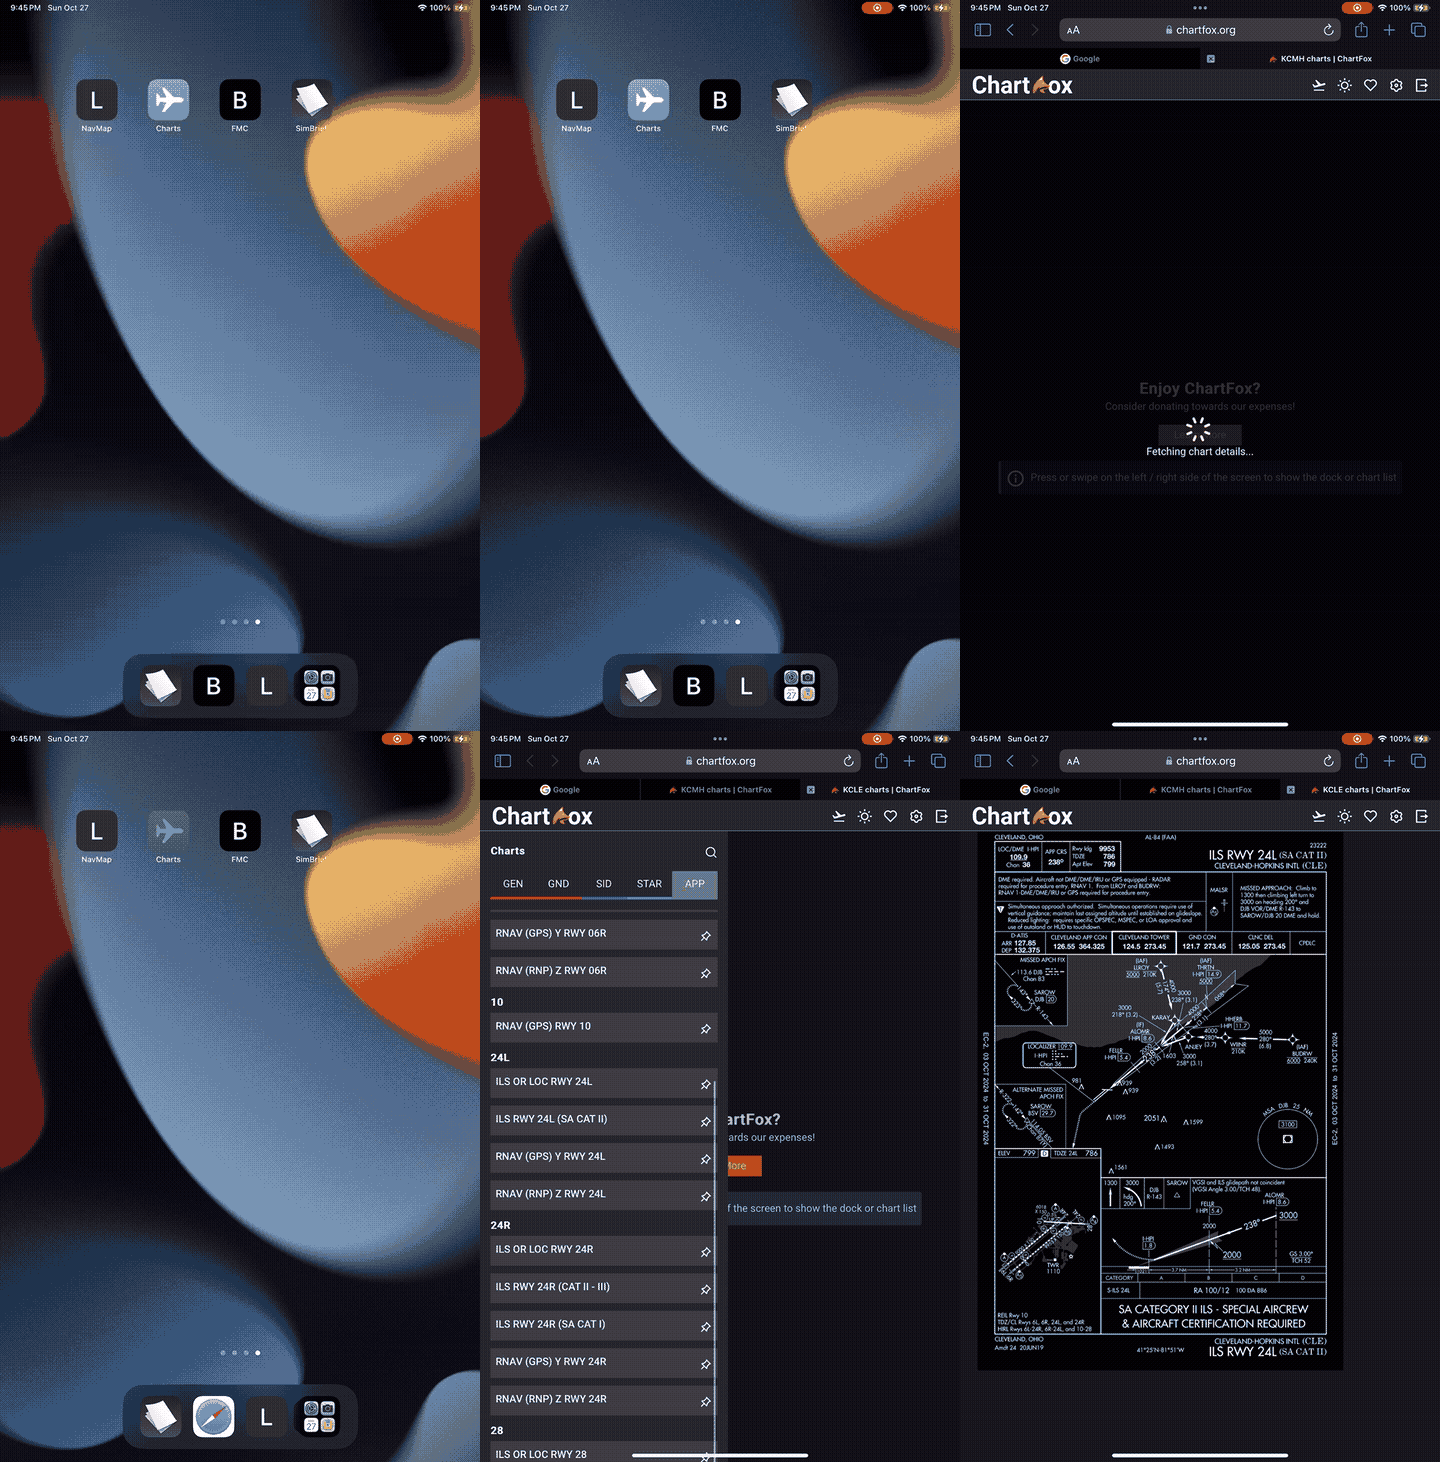
This is an iOS/iPad OS only feature, there's probably alternatives on other device but I'm an Apple guy :)
It is a super simple program using Apple Shortcuts, it requests your latest flight plan from the Simbrief API, and then creates a menu to open the airport charts on Chartfox for your flight plan.
I've created an installable version of the shortcut for download here: https://www.icloud.com/shortcuts/e7a23b7e3b624f96aa2747a9ecc08763
Make sure to fill in your Pilot ID from the Account settings section of Simbrief.
Read the Quick notes section.Quick notes#
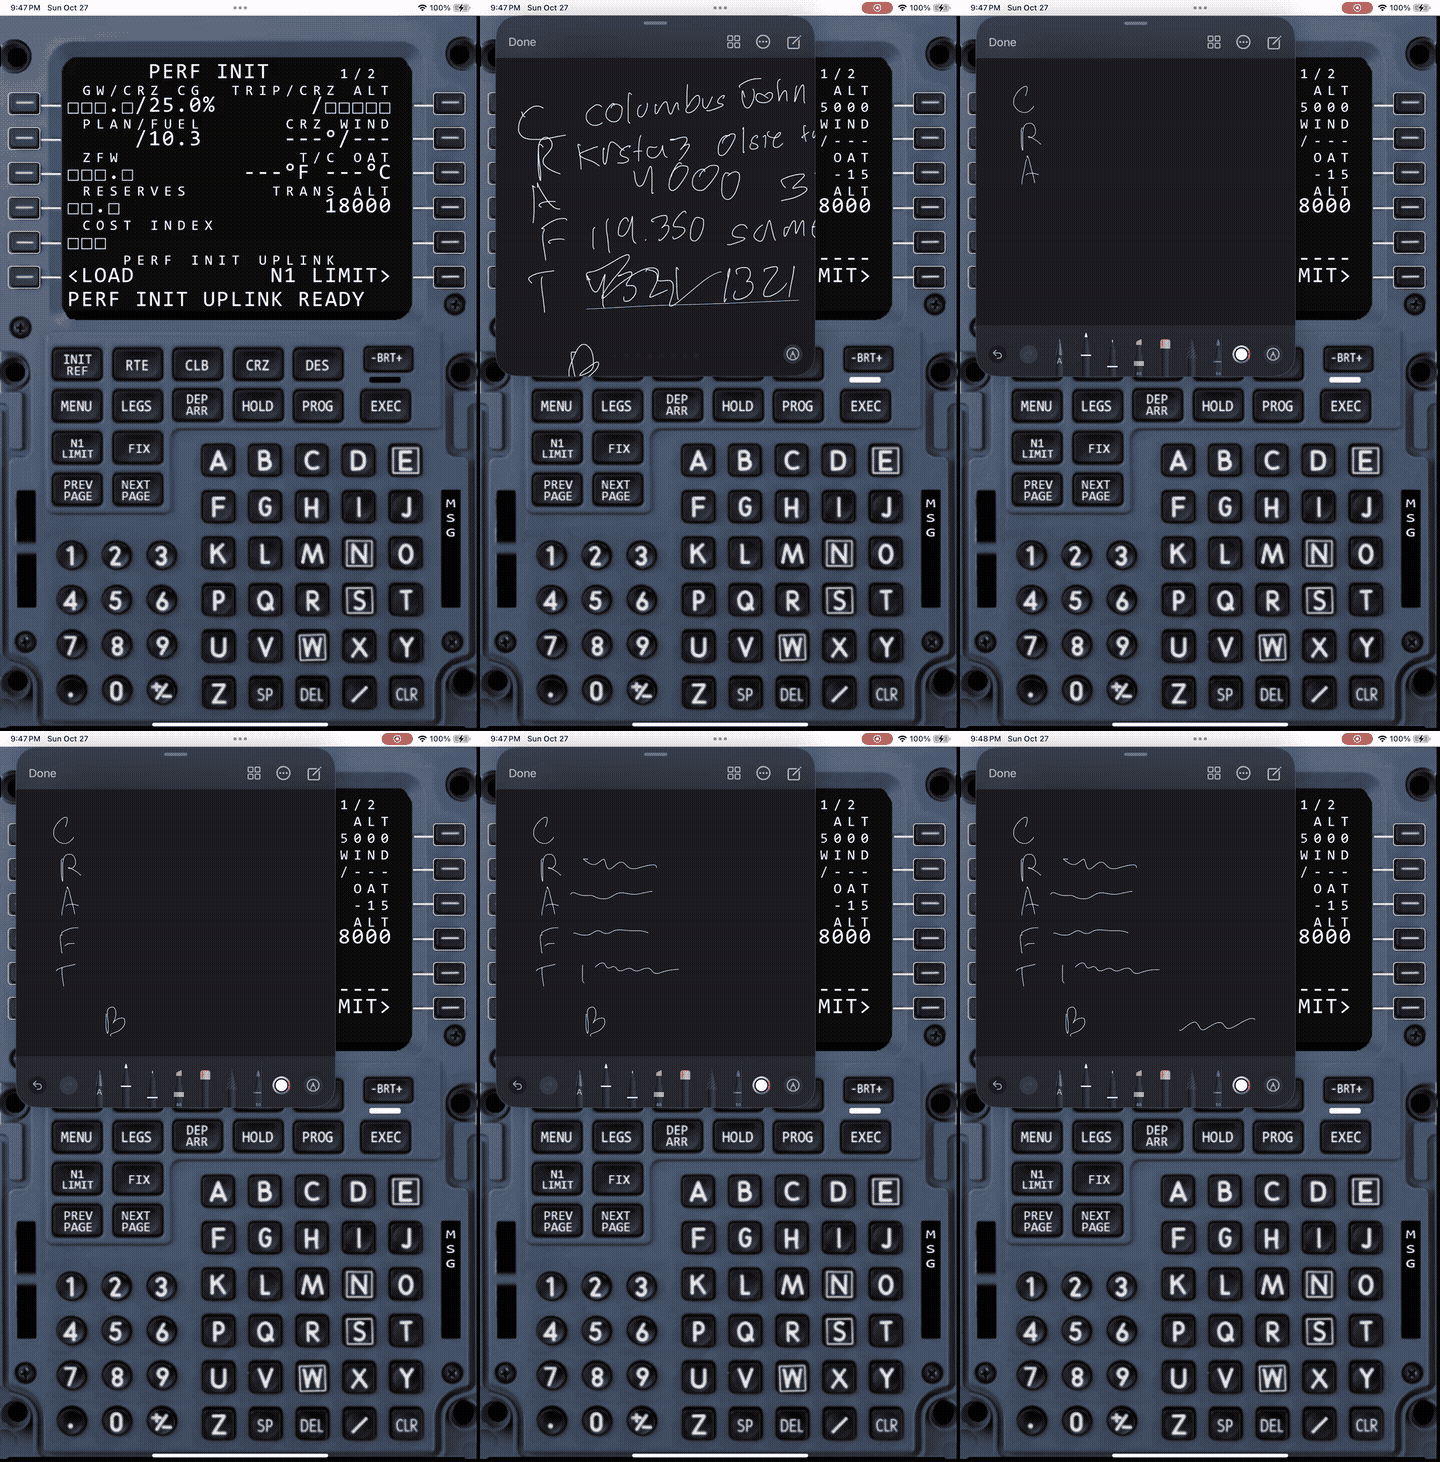
With my iPad I purchased an Apple pencil which has become invaluable for flying, especially in ATC environments like VATSIM.
You can set up a drag shortcut where can you drag from the corner of your screen to pull out a little scratch pad for taking notes.
Set this up by going to Settings -> Apple Pencil -> (Pencil Gestures) Bottom Left/Right Corner -> Quick Note
It goes without saying this is an iOS/iPad OS only feature, but I'm sure there's similar things available on other devices.
Read the Arduino MCP section.Arduino MCP#
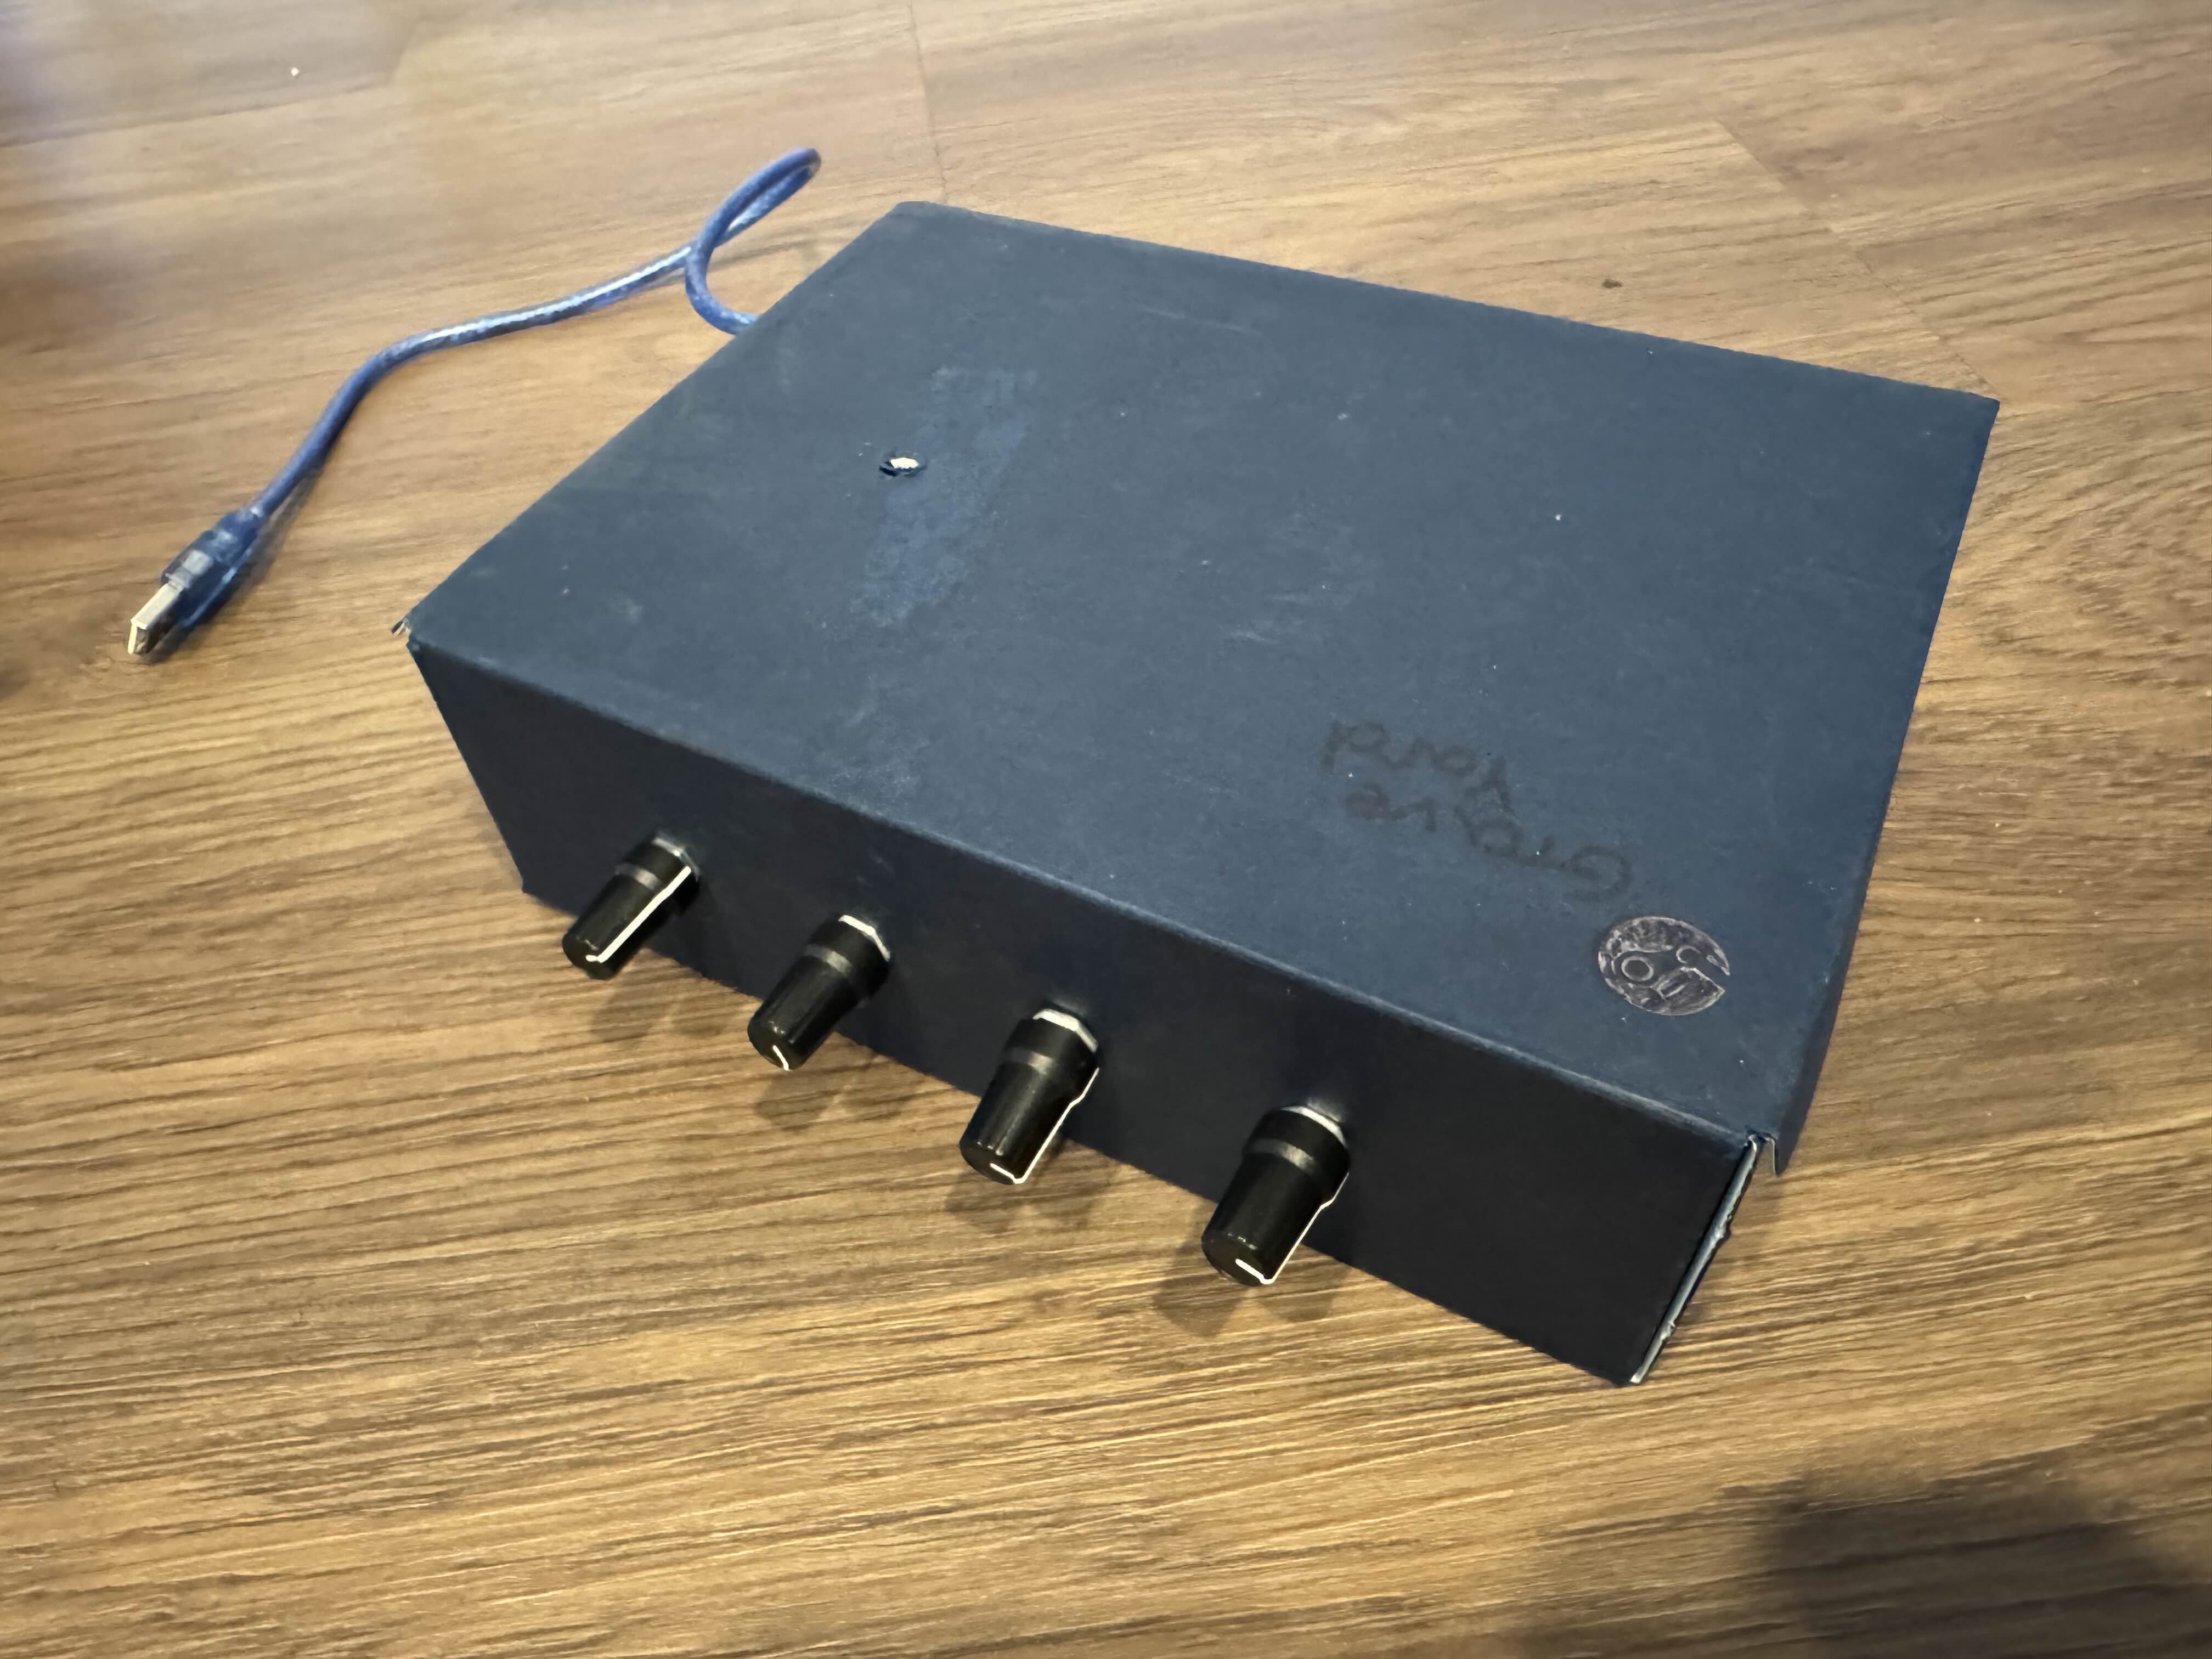
This is the latest part of my setup, but has upped my experience significantly and was the last step towards reaching full flights without using my mouse.
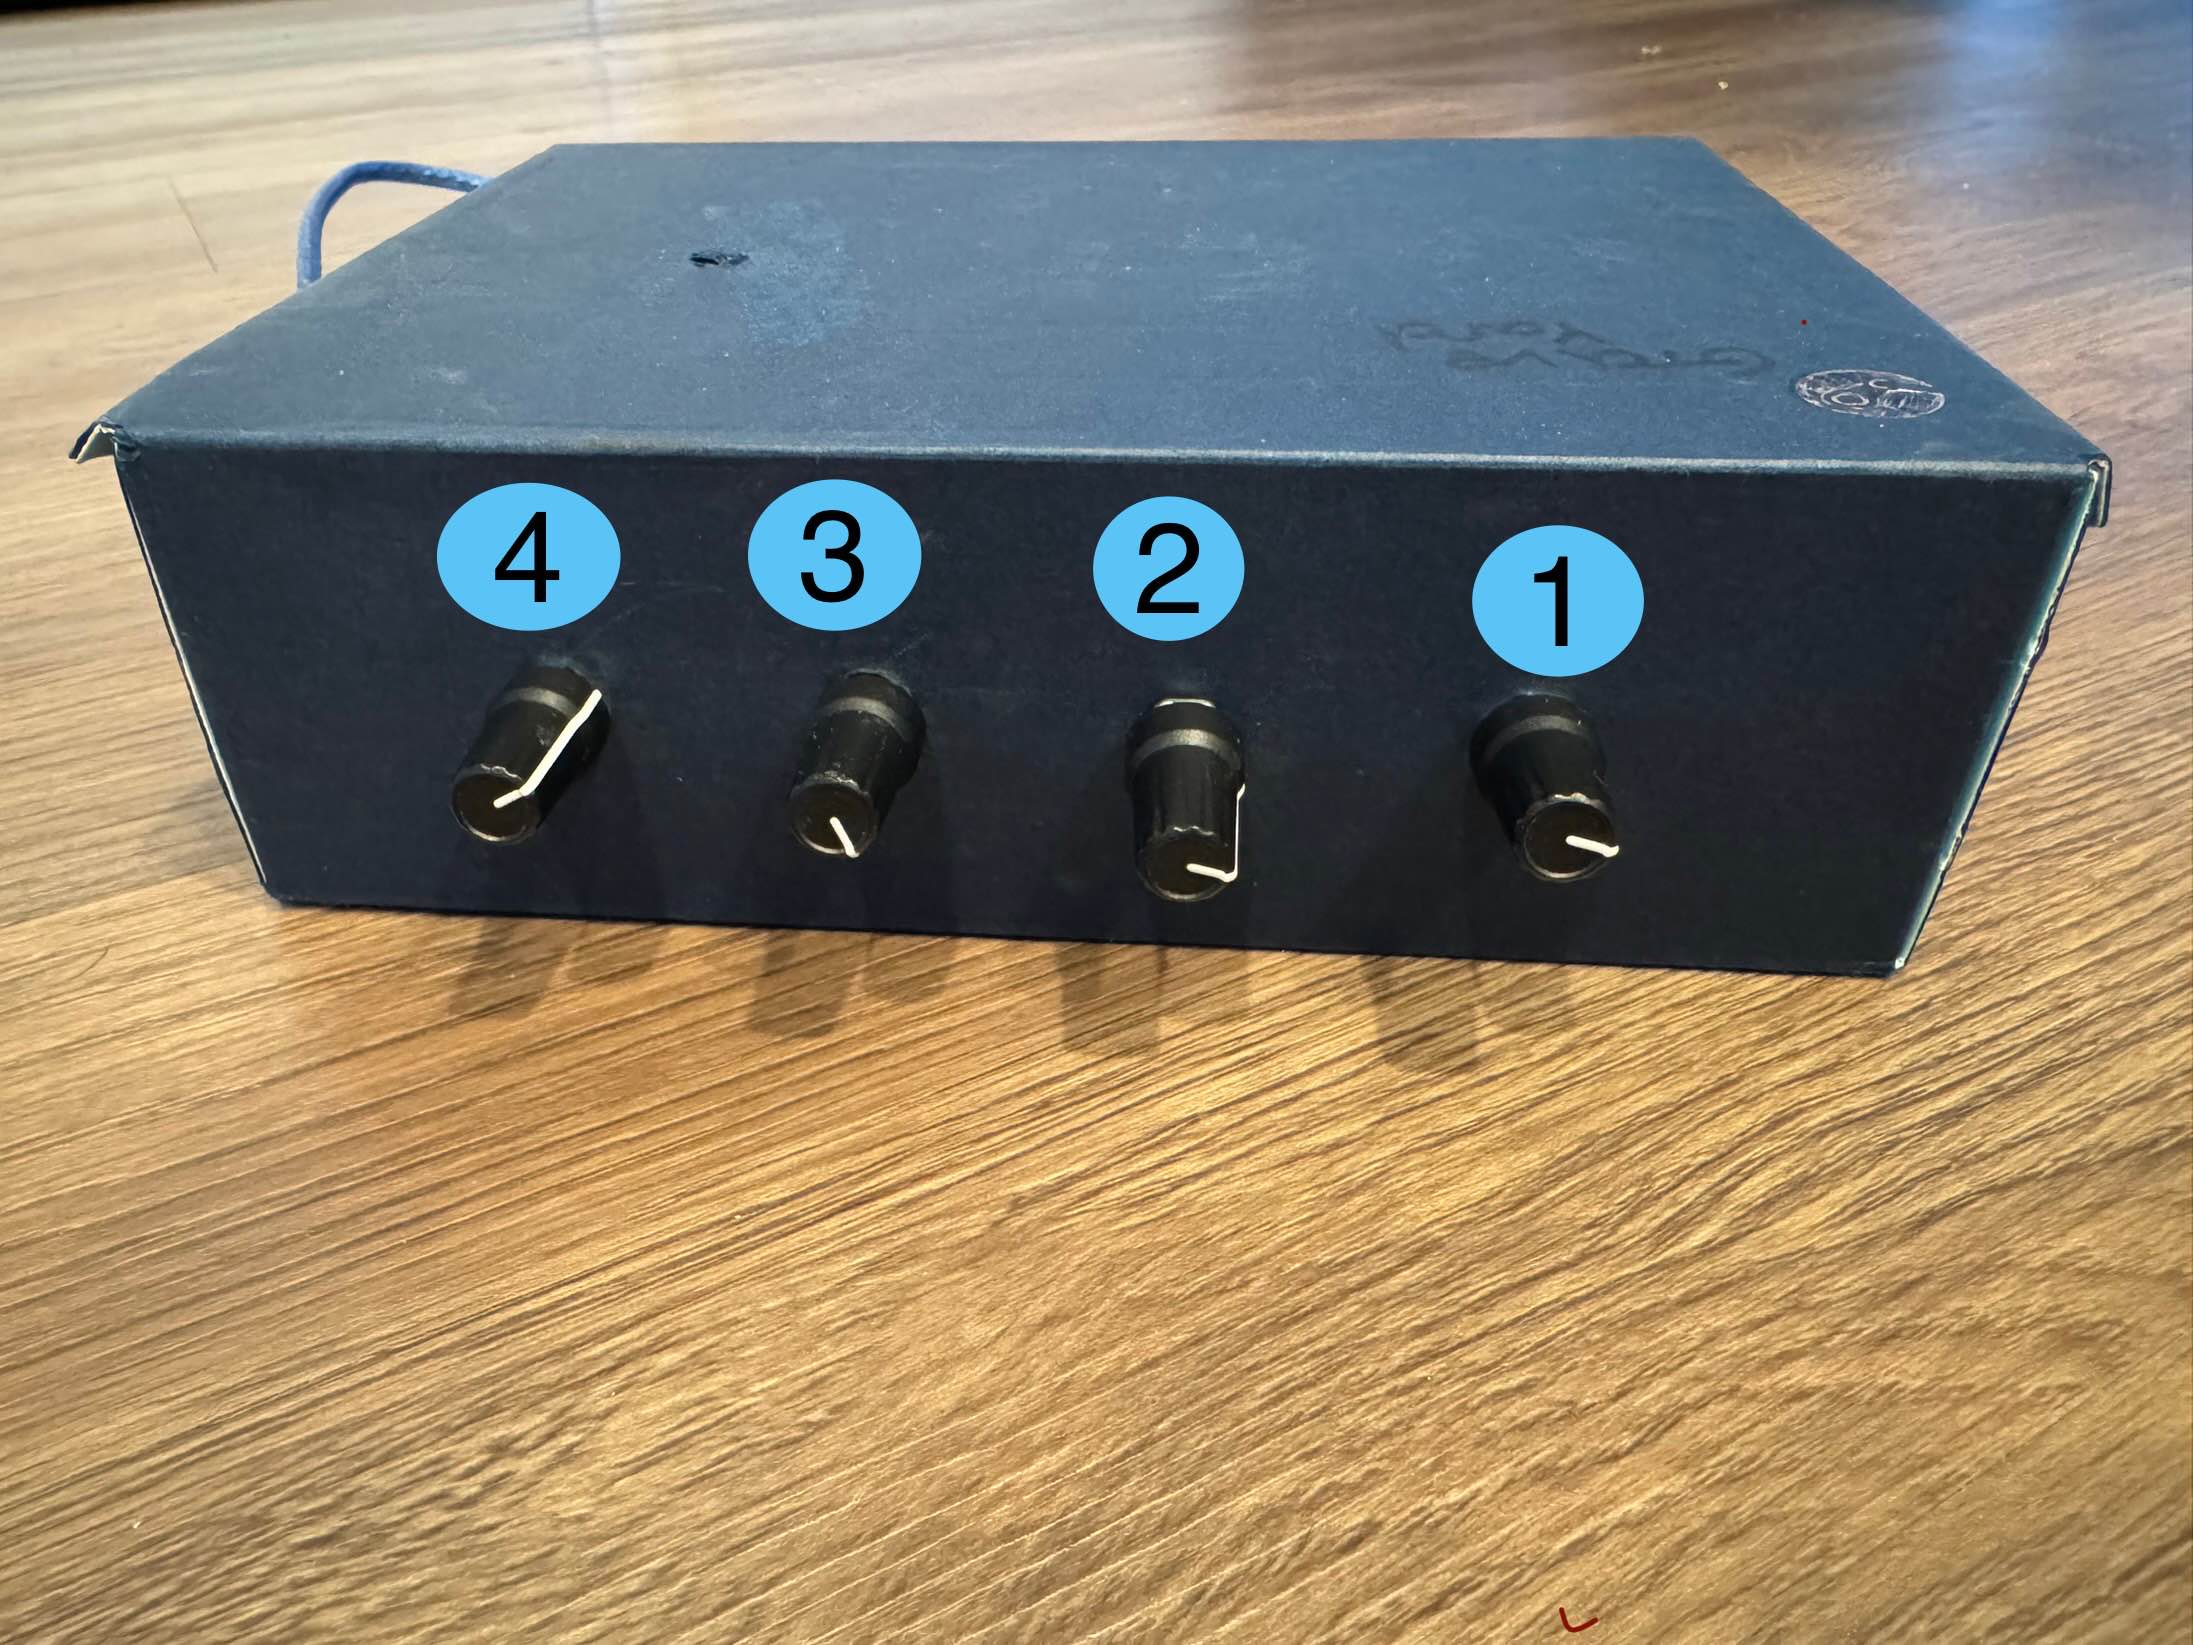
The final result came out pretty clean and I'm very happy with it.
The knobs are meant to emulate the altitude, heading, speed, and altimeter knobs, from right to left, in the order that's on the 737.
There are premade solutions for this, but they are extraordinarily expensive, so I decided it best to make it myself, and hey who doesn't love a good project.
This route may seem a little convoluted, and if you were starting fresh I'd definitely recommend some differences. But at the end of this project I only spent about 8$ for the rotary encoders. I already had the Arduino Uno and other items.
Read the Items section.Items#
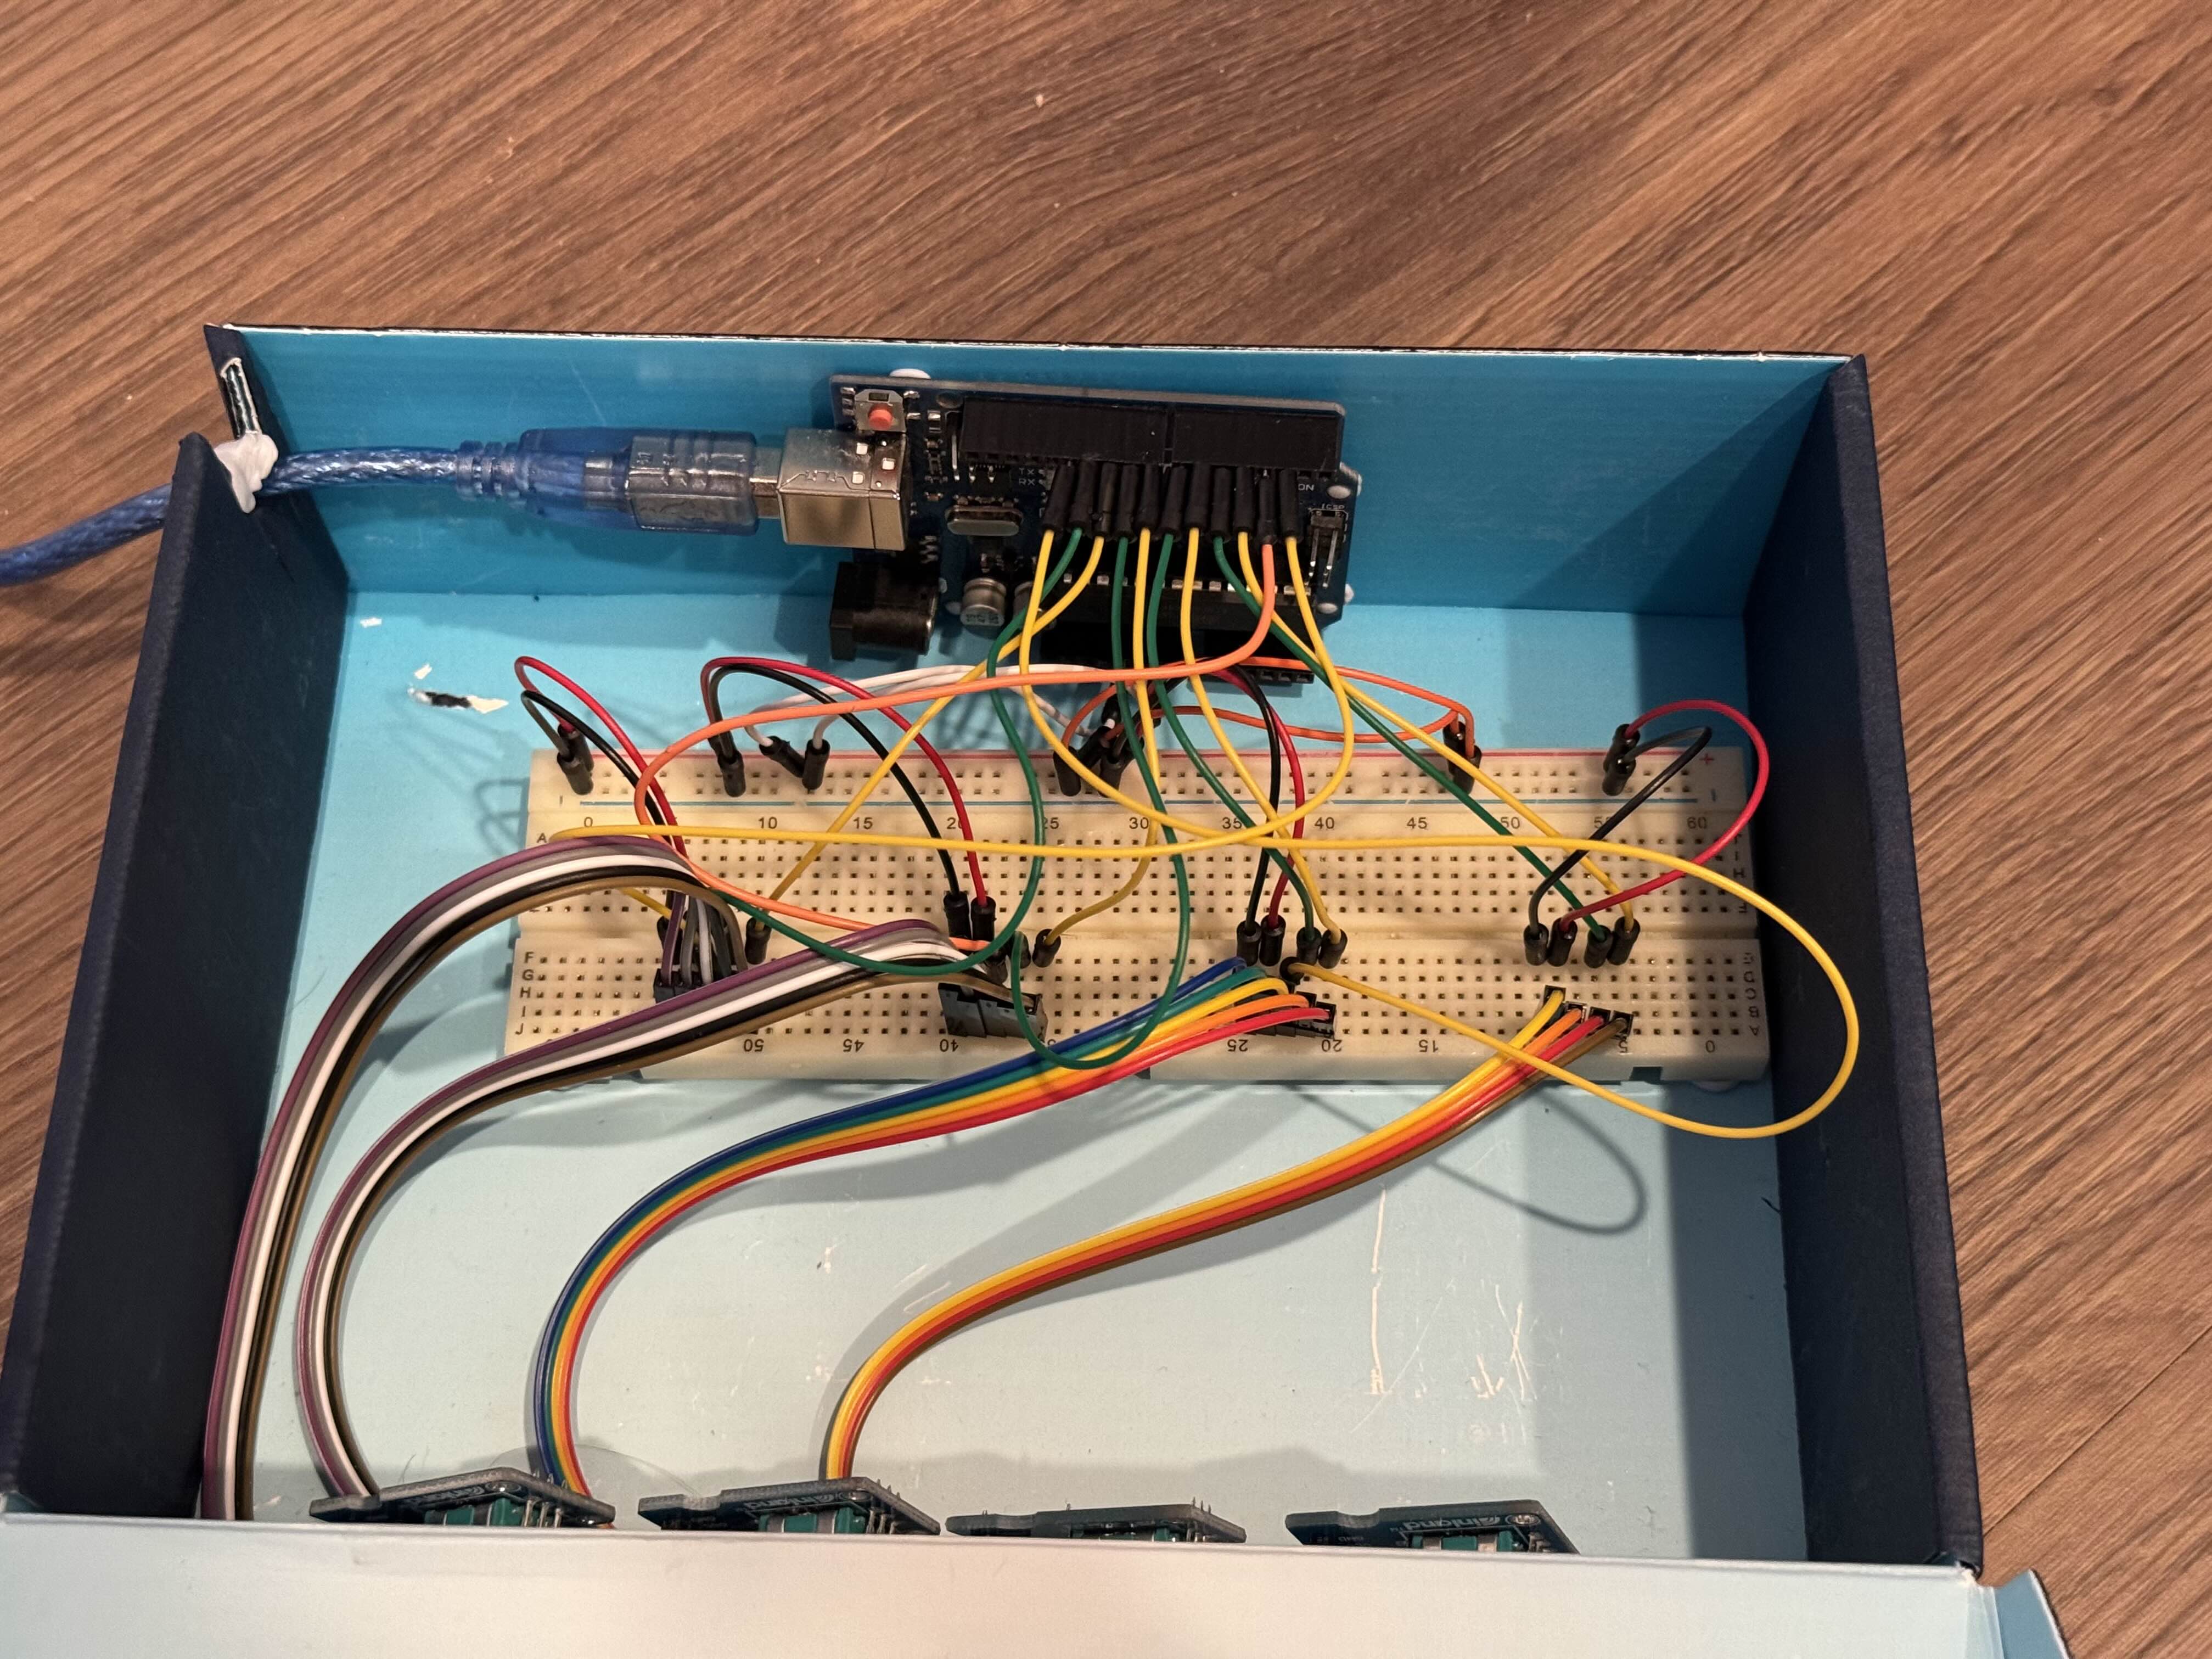
- Arduino Uno. I'll talk more in depth on this later, but an Arduino or alternative that supports Native USB would be much better. Because the Uno does not I had to work through MIDI.
- Rotary Encoders. I have a local Microcenter so I went for these. But note that you will need knobs that fit, and you can find some cheaper on amazon that come with knobs.
- Breadboard
- Jumpers
- Some kind of box to put it in. I used a steam controller box lol
Here's what the inside looks like
Read the How does the Arduino talk to the plane section.How does the Arduino talk to the plane#
This is where Lorby's Axis and Ohs comes in, you can do all kinds of fun things with this piece of software, and one of the main features is being able to bind inputs to plane outputs.
But here's where the trouble of the Arduino Uno comes in, as previously mentioned, the Uno does not support native USB.
Note: "Native USB" or USB device mode, means the Arduino's firmware can be flashed in a way to allow for a computer to recognize the device not as an Arduino but as whatever the developer wants it to be. In this case libraries like MIDIUSB could be used.
So I did some digging and saw that Axis and Ohs supports MIDI devices for inputs! Even thought it's a bit complicated, this opens a door for Arduino's without native USB capability. Here's how.
A couple of cool people in the Arduino community have made a translation layer between the Serial connection the Arduino offers and a "fake" (virtual) MIDI device.
- Hairless MIDI, this creates a MIDI listener and parser which connects to the Serial port of the Arduino, making it so you just have to do Serial.write()'s. This software is OLD and I may replace it with something more simple like serialmidi in the future.
- loopMIDI is a virtual MIDI loopback as Hairless MIDI does not create an actual device. This does, and then from within Hairless MIDI, you set your MIDI out to the loopMIDI port, and it will look like you've plugged in a real MIDI device.
- Buxtronic's Rotary Library is a library I used on the Arduino for reading rotary inputs, instead of trying to figure it out myself. There's a really nice article to go along with it here.
- The ardumidi library that comes with Hairless MIDI that says it's from ttymidi. Not sure where it really comes from :)

From here, all that needs to be done is programming the Arduino to send out MIDI data when the knobs are turned or pressed (that's right more buttons!)
Here's my code
1#include "ardumidi.h"2#include "Rotary.h"34typedef struct {5 Rotary rotary;6 byte channel;7 int buttonPin;8 byte buttonChannel;9 int buttonState;1011 setButtonState(int state) {12 this->buttonState = state;13 }14} controller_t;1516int BUTTON_ON = LOW;17int BUTTON_OFF = HIGH;1819controller_t altimeterController {Rotary(10, 11), 0xBF, -1, 0x0, -1};20controller_t speedController {Rotary(8, 9), 0xC1, 3, 0xC5, BUTTON_OFF};21controller_t hdgController {Rotary(6, 7), 0xC2, 12, 0xC4, BUTTON_OFF};22controller_t altController {Rotary(4, 5), 0xC3, 2, 0xC6, BUTTON_OFF};2324controller_t* controllers[4] = {&altController, &hdgController, &speedController, &altimeterController};2526void setup() {27 Serial.begin(115200);28 pinMode(LED_BUILTIN, OUTPUT);29 for (int i = 0; i < 4; i++) {30 controller_t* controller = controllers[i];3132 if (controller->buttonPin != -1) {33 pinMode(controller->buttonPin, INPUT_PULLUP);34 }35 }36}3738void loop() {39 for (int i = 0; i < 4; i++) {40 controller_t* controller = controllers[i];41 unsigned char result = controller->rotary.process();4243 if (result == DIR_CW) {44 midi_controller_change(controller->channel, 0x00, 0x07F);45 } else if (result == DIR_CCW) {46 midi_controller_change(controller->channel, 0x00, 0x01);47 }4849 if (controller->buttonPin != -1) {50 int buttonState = digitalRead(controller->buttonPin);5152 if (buttonState == controller->buttonState) continue;5354 controller->setButtonState(buttonState);55 if (buttonState == BUTTON_ON) {56 midi_controller_change(controller->buttonChannel, 0x00, 0x1);57 } else if (buttonState == BUTTON_OFF) {58 midi_controller_change(controller->buttonChannel, 0x00, 0x0);59 }60 }61 }62}
Once all the kinks are worked out, it is a relatively simple setup.
From here, you can now make listeners for the loopMIDI device inputs in Axis and Ohs which makes this small input setup able to do an infinite number of things in the simulator.
- Altitude selector, no click
- Heading bug selector. When presssed resets heading to current heading
- Speed selector, When presssed toggles SPD INTV for VNAV intervention
- Barometric Altimeter selector, When presssed sets STD baro
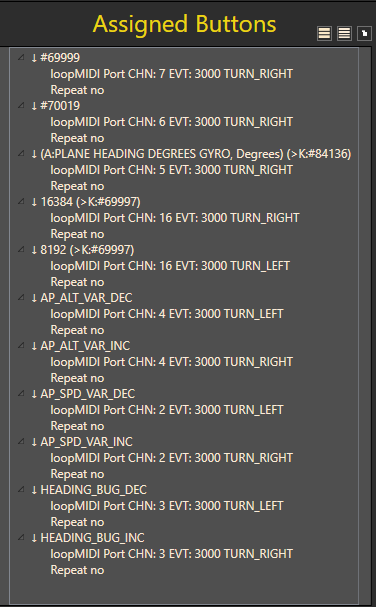 Using Axis and Ohs I define my inputs simply but doing the action on my controller, then searching for my event.
Most built-in SimConnect events work with PMDG but there are a couple where you must use PMDG SDK events.
You should have no problems with the AP_ALT_VAR_INC/DEC, AP_SPD_VAR_DEC/INC, HEADING_BUG_DEC/INC events. But here's an explanation for the difficult ones:
- HEADING_BUG_DEC/INC is in the Flight Assistance tab, not the Autopilot tab
- Speed Intervention's code is #70019
- Set Standard baro's code is #69999
- PMDG's altimeter does not appear to work with SimConnect's KOHLSMAN_INC/DEC, and does not have an alternate inc/dec. Instead you must use mouse commands, so we send a MOUSE_WHEEL_UP/DOWN code to the #69997 SDK event. E.g
16384 (>K:#69997) - Setting heading bug to current heading seems to be a feature in some aircraft, but not a SimConnect standardized event. For this I simply made the button run an RPN script:
(A:PLANE HEADING DEGREES GYRO, Degrees) (>K:#84136)
Note: PMDG has a bit of a convoluted, but necessary system for their events made up of numeric codes for individual events. These are all for the PMDG SDK, if you don't fully understand it make sure to read AAO's and PMDG's own documentation about interacting with the aircraft. You can see a list of events and variables in your planes installation folder at .../Community/pmdg-aircraft-738/Documentation/SDK/PMDG_NG3_SDK.h (documentation is in the same folder)
Read the The future of the MCP panel section.The future of the MCP panel#
I wrote this article right after finishing this project, so there's still some things to add and update.
It's obvious by looking at it, that it's a bit thrown together. The next step is going to be to start 3D printing some of the pieces.
I'd love to make a more hard box with less margin for knob and button wiggle, mountings for the Arduino and breadboards etc.
Something else cool I'd like to 3D print are the knobs, it'd be awesome to see them modeled like the 737 MCP knobs.
I've actually stumbled across a really cool website and guy here: https://www.737diysim.com/shop
They've got some really cool premade components and lots of purchasable CADs.
The 737 physical FMC would be a really cool upgrade at some point. They also have an MCP
that looks like the real deal, it's pretty cool.
I'd be surprised if I don't get caught buying a couple designs and components off of this site :)
There's also some cool concepts online for stacked rotary encoders like this YouTube video: https://youtu.be/y-ogU60UHIU?si=UR3IQmVzZ1fSg8EO
I also want to package together the loopMIDI and Hairless MIDI logic into a windowless app that can be run automatically when I plug/unplug the box. Though, I may just "splurge" (it's like 10$) and get a board with Native USB support
Read the Stream Deck section.Stream Deck#
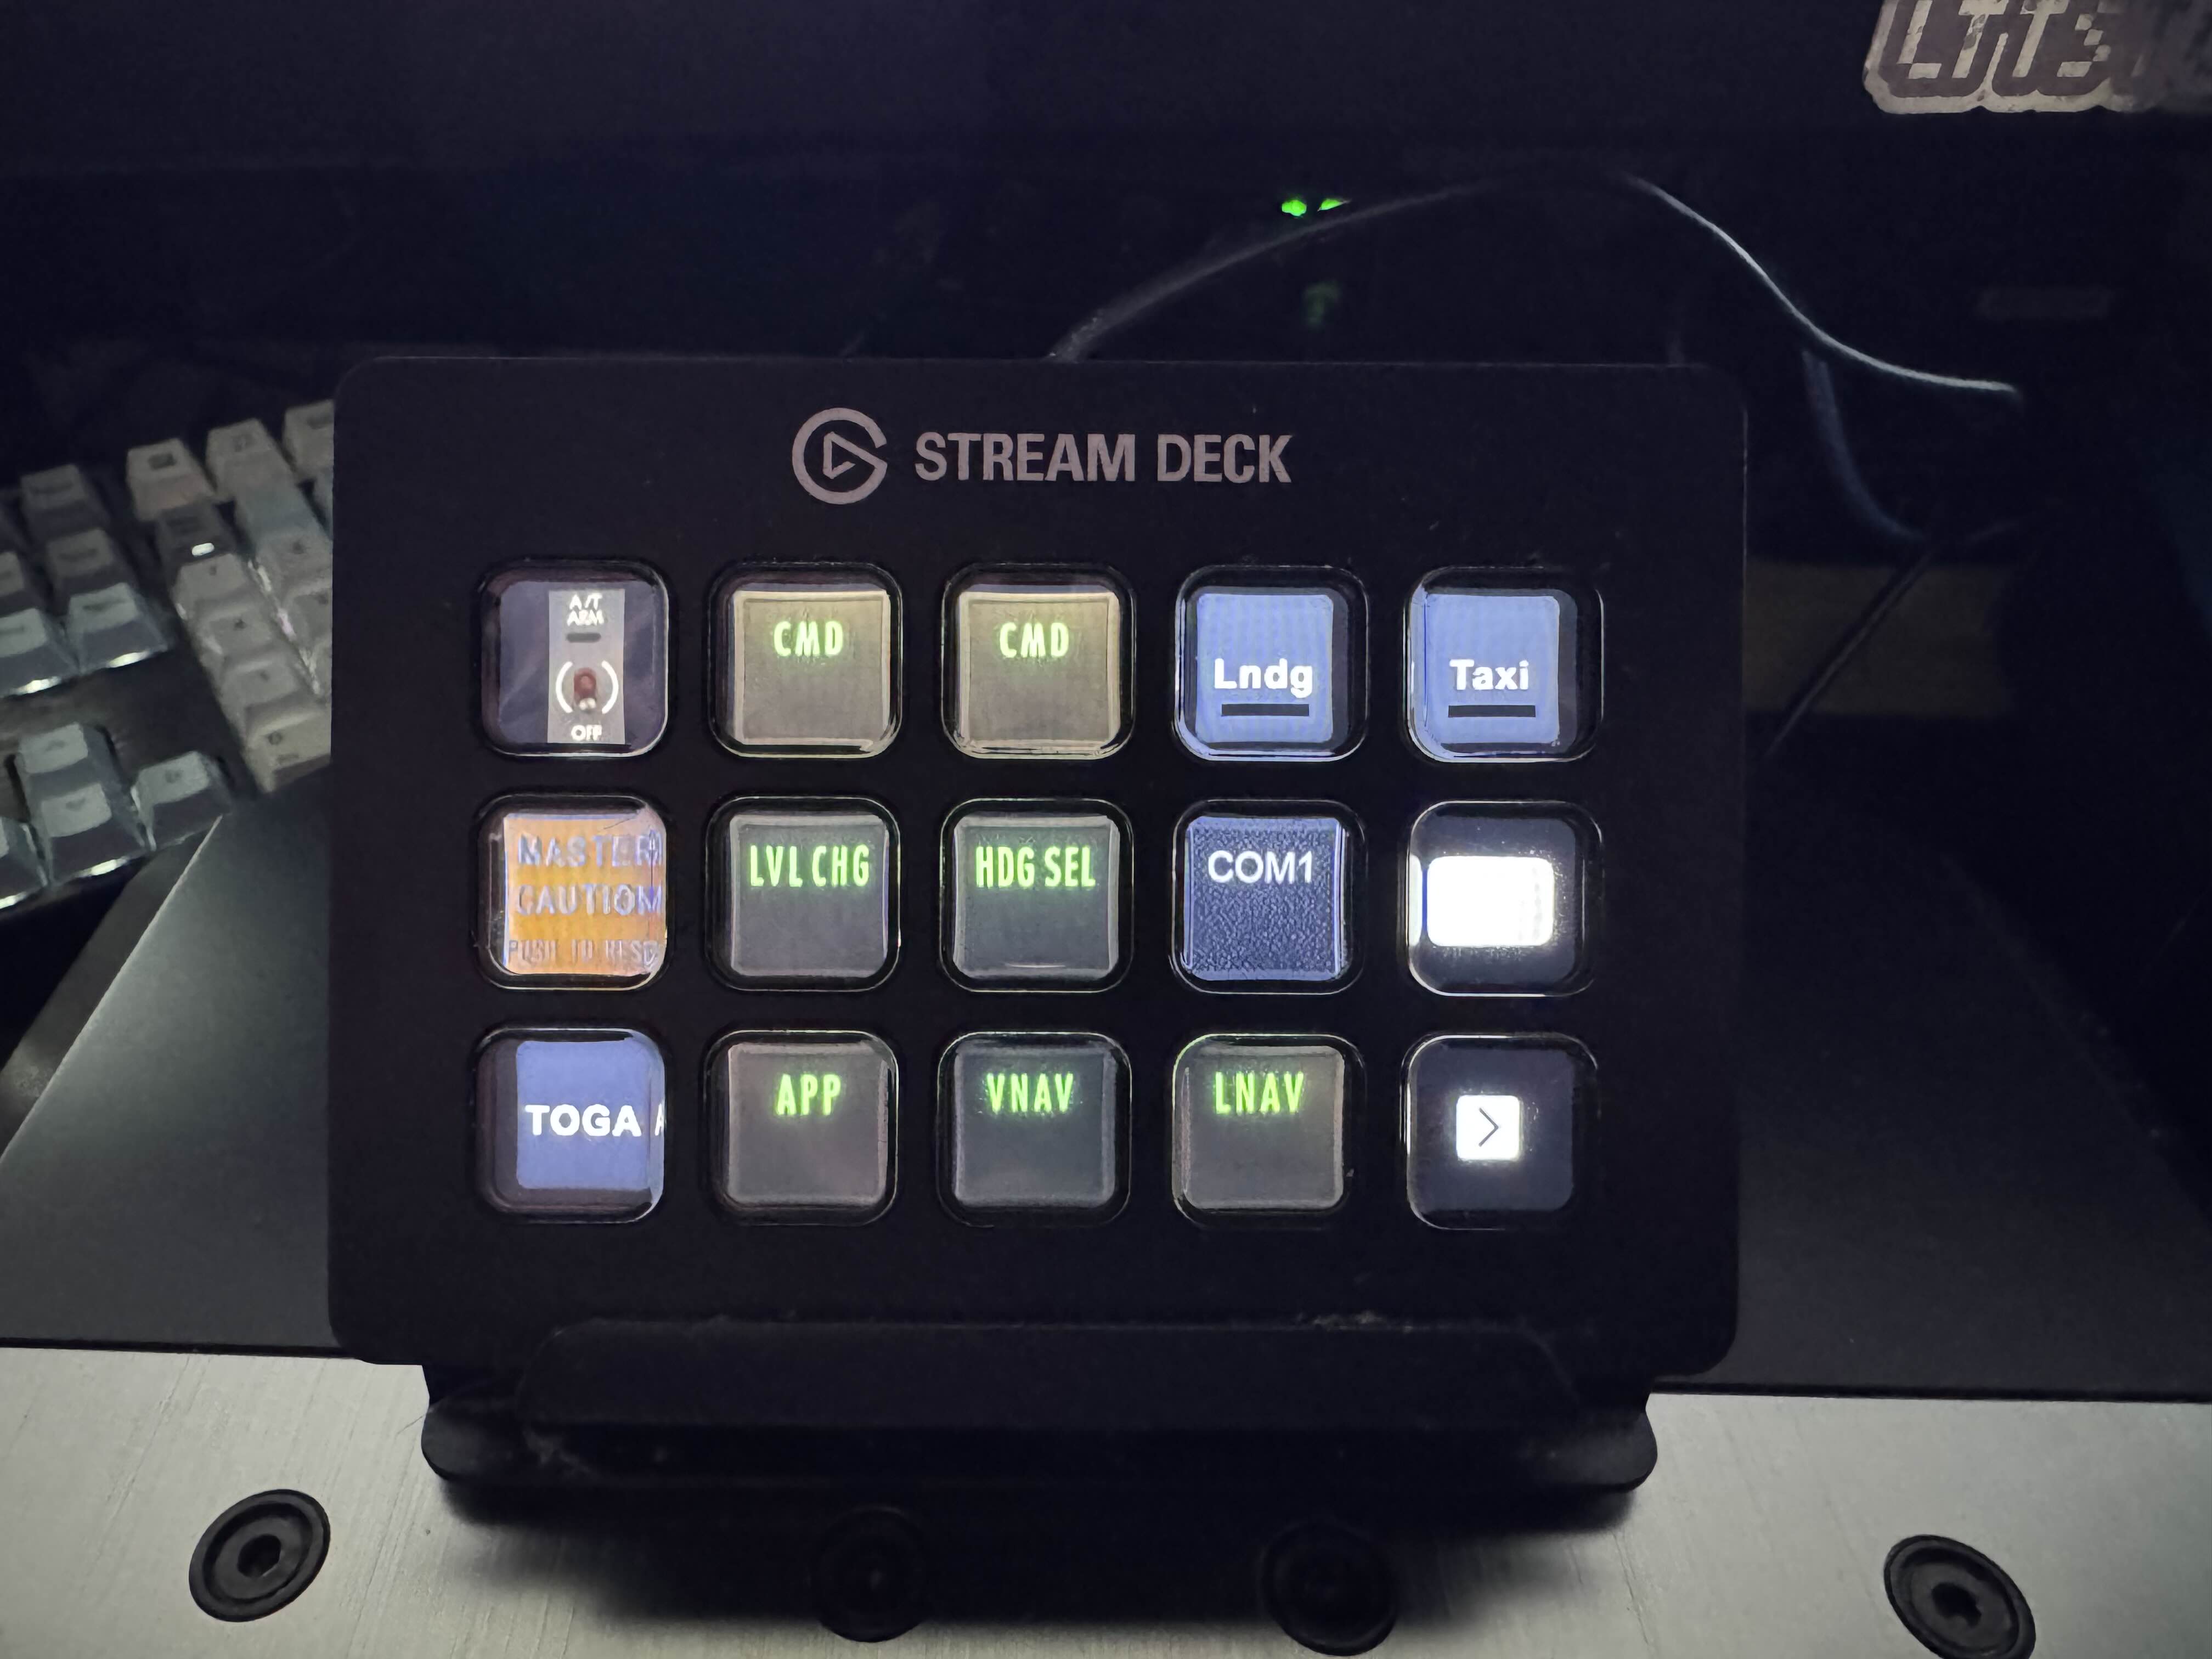
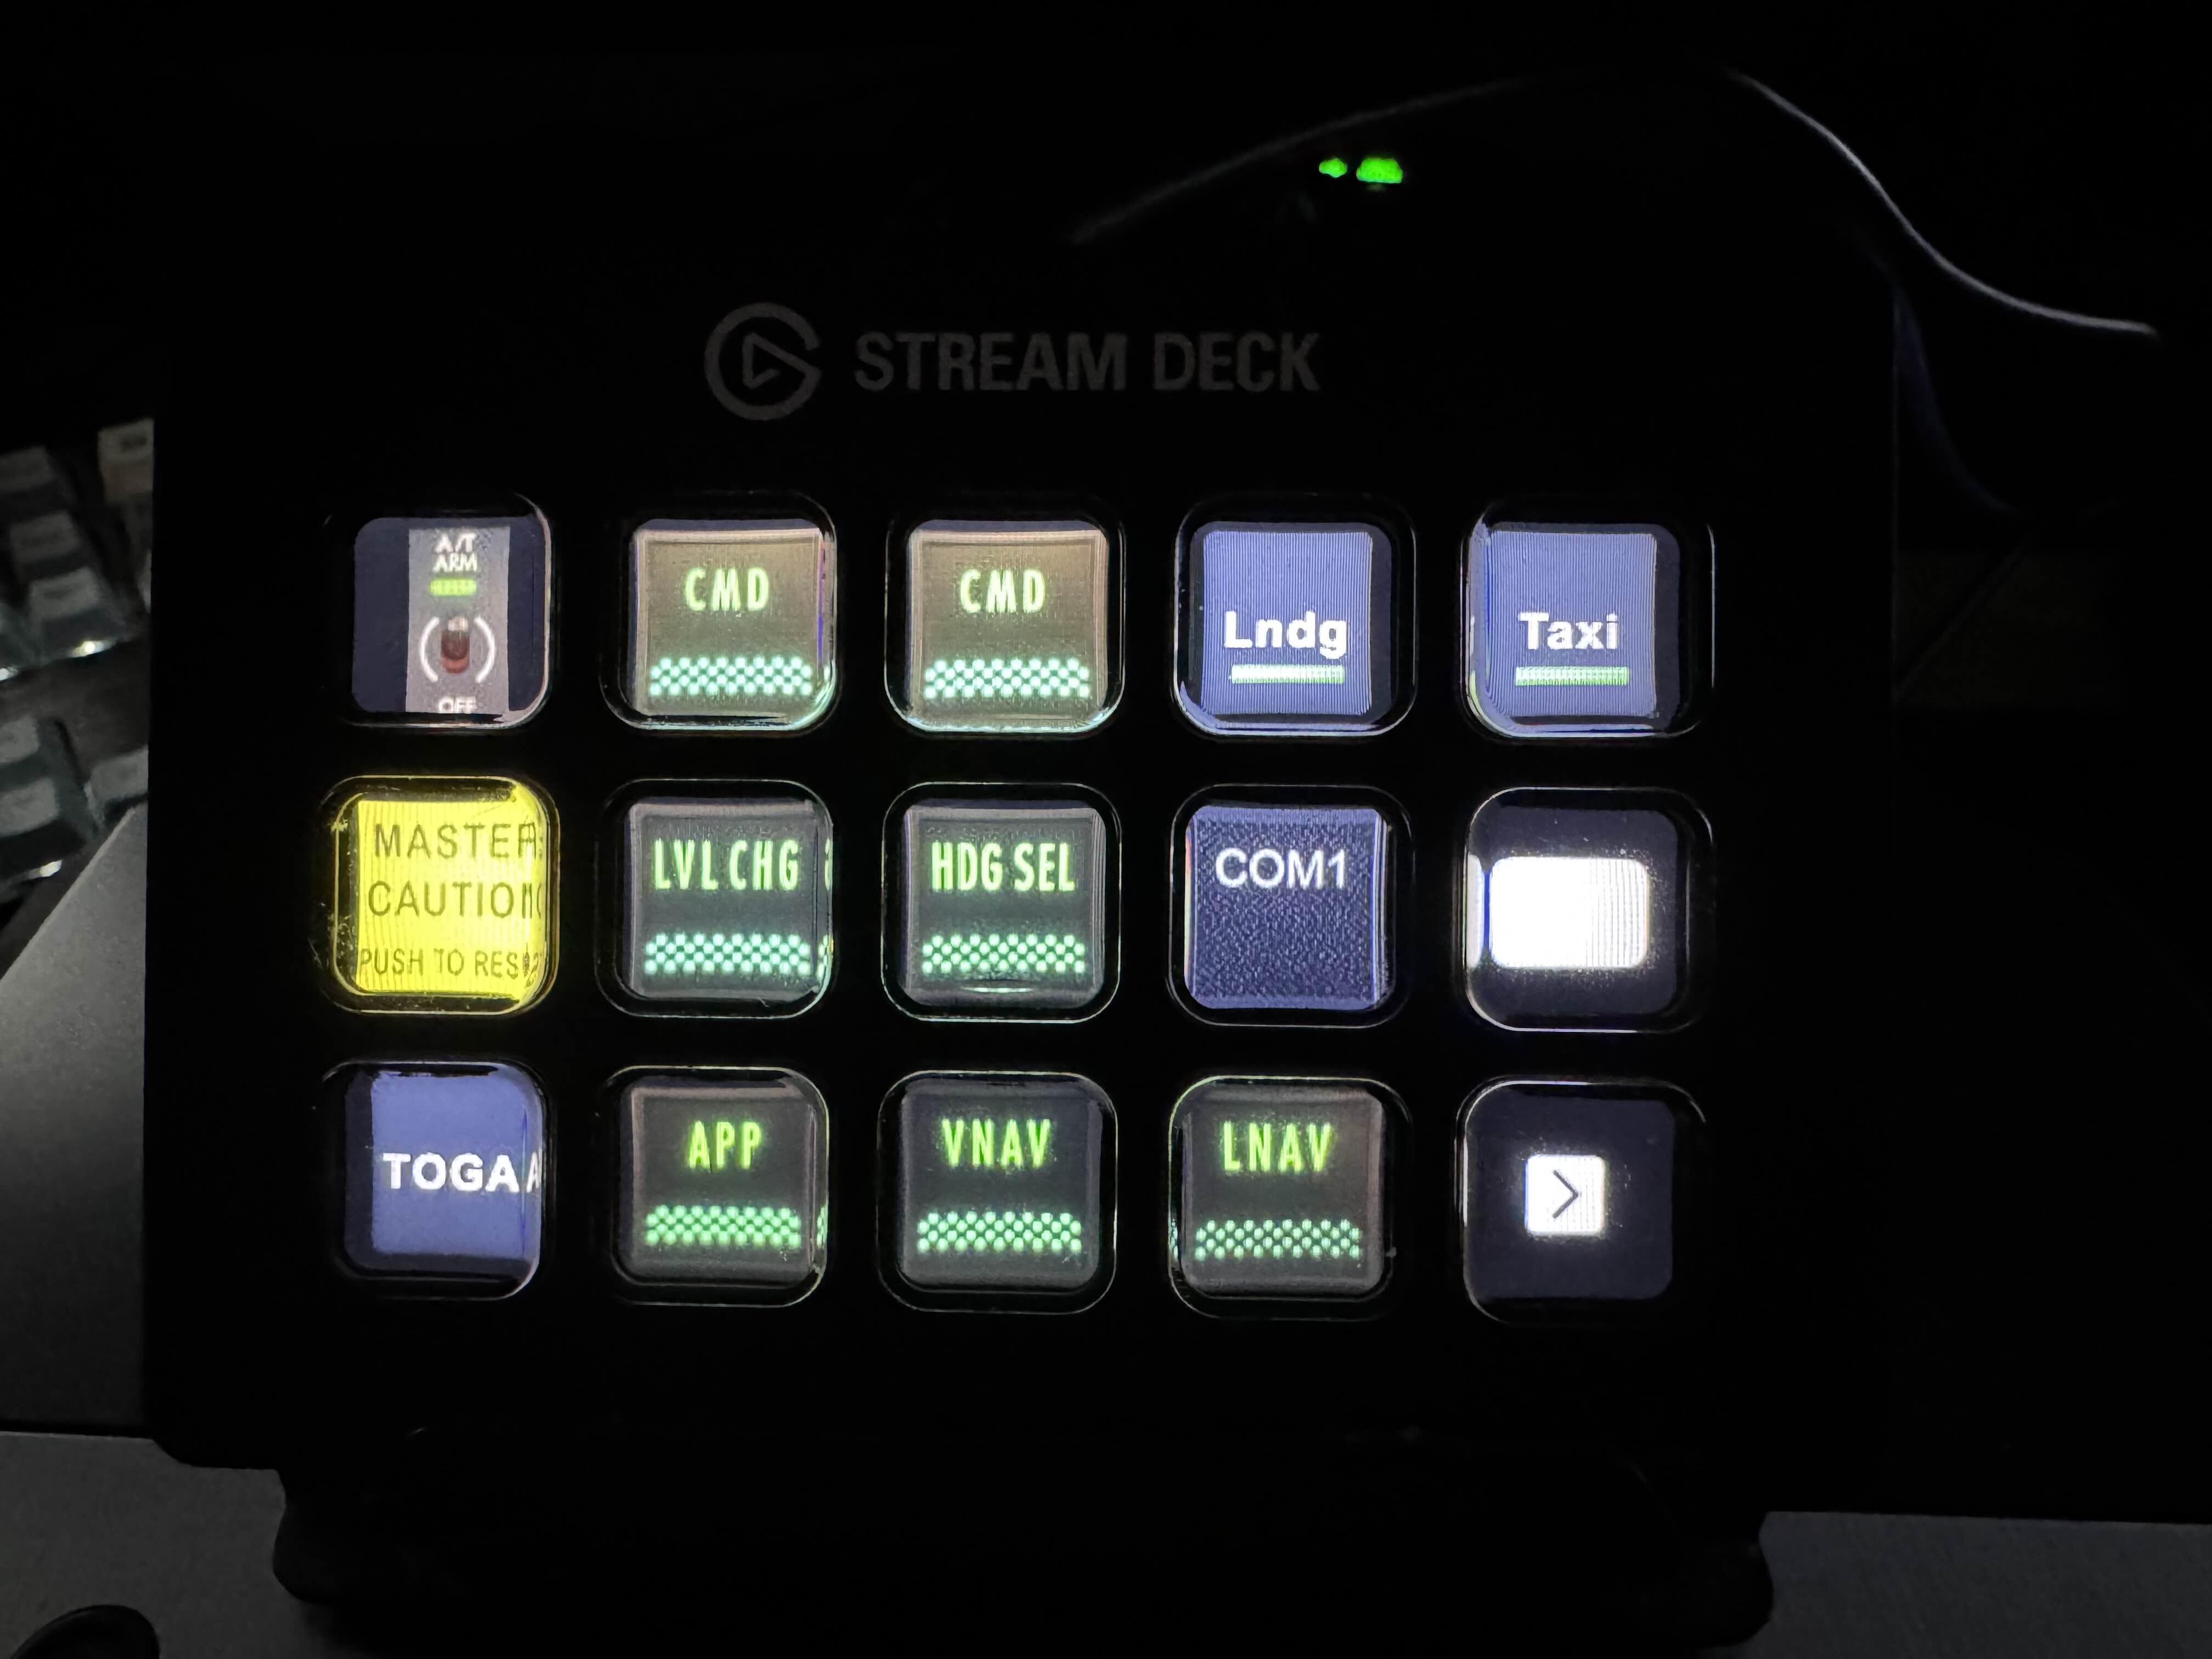
The Elgato Stream Deck, while being the least technically impressive part of this setup, it is certainly a lifesaver, and is a great way to get feedback from the simulator especially from things off center-screen. The screens will change state based on the state of the game, making it easy to see what's on and off.
I have an Elgato Stream Deck (Classic) which can be found here: https://a.co/d/3rmfgvS
I've had this for a long time and eventually stopped using it, and when I started all of this I pulled it out of storage and immediately it was a great way to interact with the game out of the limits of how many buttons were on my primary flight controls.
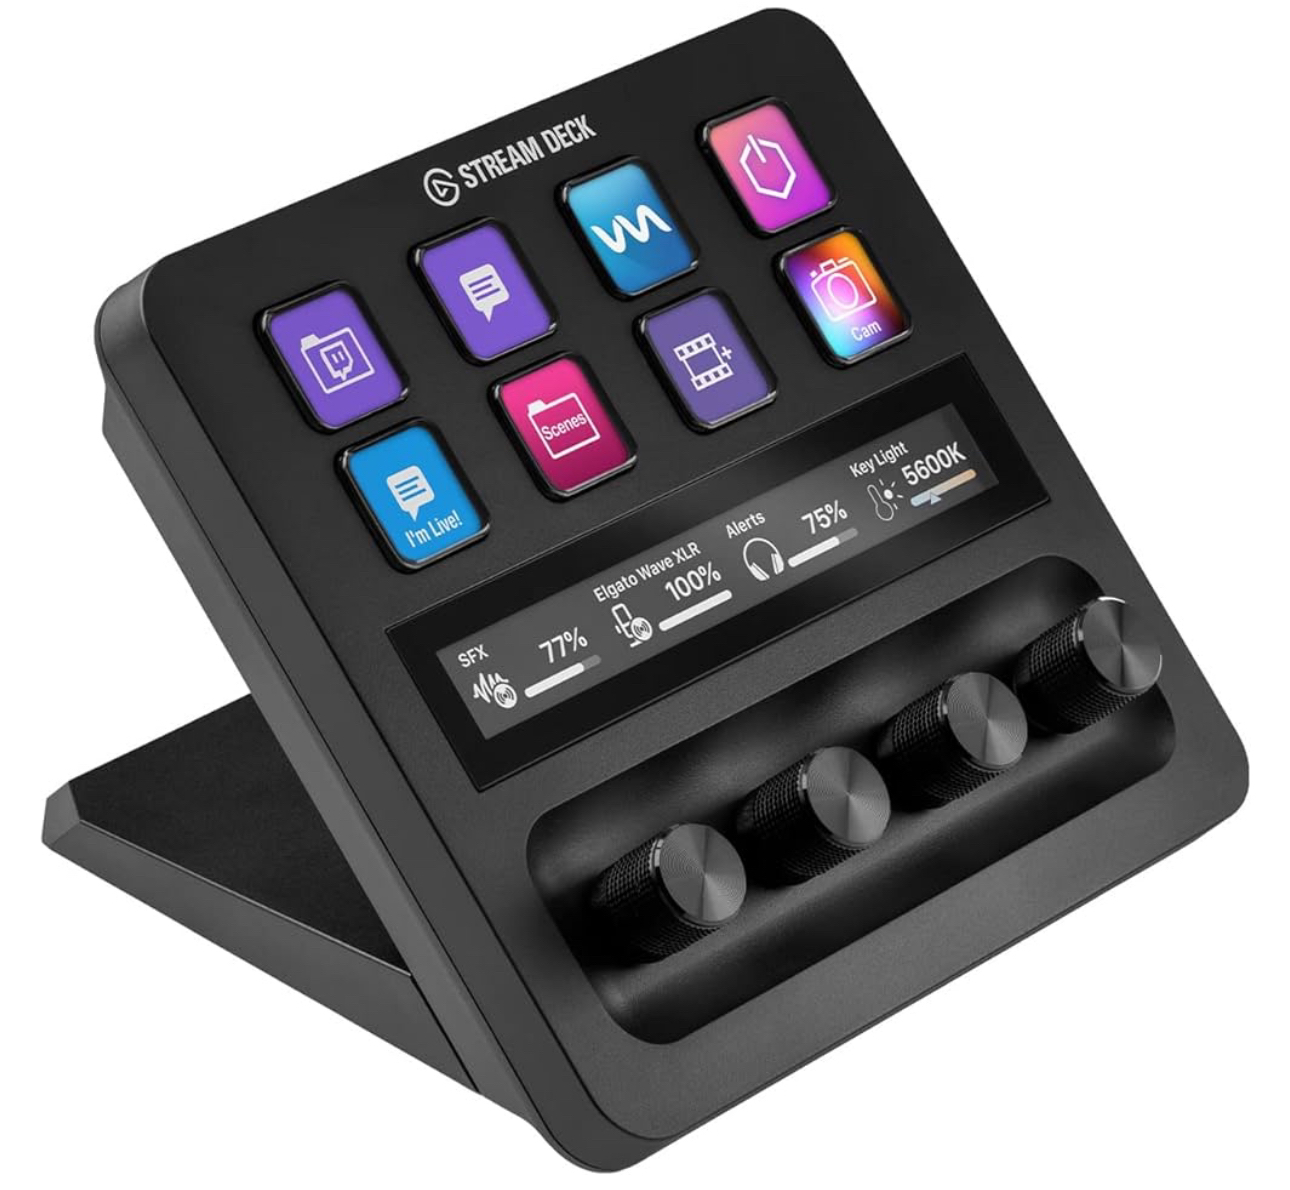
Note: If you've got some money laying around, Elgato released the Stream Deck+, which has knobs and customizable screens. This would be a great way to get the MCP and Stream Deck features all-in-one AND you can see the numbers in real life. I think this is awesome and I had to fight myself not to just go get this. Available here: https://a.co/d/gCt0Le9
Here are my plugins:
Read the Nguyễn Quý Hy‘s Flight Tracker StreamDeck plugin section.Nguyễn Quý Hy‘s Flight Tracker StreamDeck plugin#
FlightTracker is an awesome FREE plugin that interacts with the simulator directly though SimConnect rather than Axis and Ohs, so I really want to shout out this piece of software for being completely free unlike AAO.
I had used this software before eventually purchasing AAO, and was a great free way to get started with extensibility. Unfortunately however, the plugin does not work with PMDG specific SDK events and simVars, making it quite crippled on anything other than first-party planes in MSFS.
I'm now using AAOs Stream Deck plugin for all except FlightTrackers radio tuning buttons which are really cool features! They let you tune COM, NAV, and XPDR numbers from the Streamdeck using a numpad on the screen. Take a look:
Read the Lorby's Axis and Ohs Stream Deck plugin section.Lorby's Axis and Ohs Stream Deck plugin#
Axis and Ohs comes with a first party plugin for the Elgato Stream deck, available for download on their downloads page, under "Plugin for the Elgato Stream Deck"
Because this uses the AAO translation layer, it works flawlessly with PMDG aircraft. I use this for pretty much everything but the COM/NAV/XPDR tuning.
Read the Customizations section.Customizations#
I went through great lengths to individually screenshot the AP buttons for use as Stream Deck icons and you can use my work. Download
I'll also leave my Stream Deck profile here: Download. Feel free to use it and change it however you'd like.
This profile is heavily only usable on the PMDG 737 series. Even the 777 doesn't work very well with it. I do plan on creating a stock MSFS simconnect profile and a 777 profile eventually which I'll drop here when I do.
Read the Conclusion section.Conclusion#
I fully doubt anyone has read this far into my post, but if you have, I thank you very much.
This has been a pretty cool journey building this setup piece by piece, and I'm sure it'll only get crazier. This has really engaged my creative and technical mind, and of course my love for aviation.
If you don't know me I'm JPBBerry, I'm a 21 year old full-time software engineer, and I've been working in tech longer than I haven't been. And I dearly hope you've enjoyed.
Next time!
My website | GitHub | LinkedIn
